<?xml version="1.0" encoding="utf-8"?><feed xmlns="http://www.w3.org/2005/Atom" ><generator uri="https://jekyllrb.com/" version="3.10.0">Jekyll</generator><link href="https://amoldighe.github.io/feed.xml" rel="self" type="application/atom+xml" /><link href="https://amoldighe.github.io/" rel="alternate" type="text/html" /><updated>2026-05-22T15:19:56+00:00</updated><id>https://amoldighe.github.io/feed.xml</id><title type="html">Amol Dighe</title><subtitle>Technology, Devops, Experience</subtitle><entry><title type="html">Google I/O 2026: Entering the Agentic Era</title><link href="https://amoldighe.github.io/2026/05/21/everything-announced-at-google-io-2026/" rel="alternate" type="text/html" title="Google I/O 2026: Entering the Agentic Era" /><published>2026-05-21T00:00:00+00:00</published><updated>2026-05-21T00:00:00+00:00</updated><id>https://amoldighe.github.io/2026/05/21/everything-announced-at-google-io-2026</id><content type="html" xml:base="https://amoldighe.github.io/2026/05/21/everything-announced-at-google-io-2026/"><![CDATA[<p>Every year, Google I/O serves as a compass for the tech industry, charting the course for the next generation of consumer experiences but this time it marked a massive paradigm shift.</p>

<p>We have officially transitioned from the “Generative Era” of AI to the <strong>“Agentic Era.”</strong></p>

<p>Instead of just responding to prompts or summarizing search queries, Google’s latest wave of technology centers on autonomous, proactive AI agents that can reason, orchestrate workflows, collaborate, and execute long-horizon digital tasks in the background.</p>

<pre><code class="language-mermaid">graph TD
    A[Gemini 3.5 Core Engine] --&gt; B(Consumer &amp; Workspace Agents)
    A --&gt; C(Developer Platforms &amp; Security)
    A --&gt; D(Hardware &amp; Wearables)
    A --&gt; E(AI Infrastructure)
    
    B --&gt; B1[Gemini Spark]
    B --&gt; B2[Universal Cart]
    B --&gt; B3[Daily Brief]
    B --&gt; B4[Ask YouTube &amp; Ask Maps]
    B --&gt; B5[Docs Live &amp; Google Pics]
    
    C --&gt; C1[Antigravity 2.0]
    C --&gt; C2[CodeMender]
    
    D --&gt; D1[Intelligent Eyewear]
    D --&gt; D2[Wear OS 7 &amp; Widgets]

    E --&gt; E1[TPU 8t &amp; TPU 8i]
</code></pre>

<p>Here is a comprehensive breakdown of every major tool and launch at Google I/O 2026:</p>

<hr />

<h3 id="1-gemini-35-flash">1. Gemini 3.5 Flash</h3>
<p>Gemini 3.5 Flash is the latest high-speed, lightweight model in the Gemini 3.5 series. It is built specifically for speed, low-latency responsiveness, and orchestrating complex “agentic” and coding workflows that require rapid, multi-step execution.</p>
<ul>
  <li><strong>Ultra-Fast Speed:</strong> It operates up to four times faster than previous frontier models, making it ideal for real-time interactions.</li>
  <li><strong>Native Integration:</strong> Immediately rolled out as the default engine powering the Gemini App and the new AI Mode in Google Search.</li>
  <li><strong>Optimized for Coding:</strong> Features highly enhanced reasoning capabilities for programming and recursive troubleshooting tasks.</li>
</ul>

<hr />

<h3 id="2-gemini-spark">2. Gemini Spark</h3>
<p>Gemini Spark is Google’s new “24/7 personal AI agent.” It is designed to act as an autonomous digital assistant that proactively manages daily chores, schedules, and digital tasks without requiring direct supervision or keeping the user’s browser active.</p>
<ul>
  <li><strong>Persistent Cloud Execution:</strong> Runs continuously on dedicated virtual machines in Google Cloud, meaning it can sort emails, flag calendar conflicts, and book appointments even when your phone or laptop is completely shut off.</li>
  <li><strong>Proactive Orchestration:</strong> Learns your habits and preferences to autonomously draft replies, organize documents, and handle digital errands.</li>
  <li><strong>Exclusive Subscription Rollout:</strong> Currently available to trusted testers and coming soon to Google AI Ultra subscribers ($100/month or included in the updated premium tiers).</li>
</ul>

<hr />

<h3 id="3-gemini-omni-and-gemini-omni-flash">3. Gemini Omni (and Gemini Omni Flash)</h3>
<p>Gemini Omni is a new multimodal generative “world model” that treats video, audio, image, and text as native inputs and outputs. It is focused heavily on real-time, creative generative video creation and fluid editing.</p>
<ul>
  <li><strong>Conversational Video Editing:</strong> Features <strong>Gemini Omni Flash</strong>, allowing users to generate and modify video content simply by speaking to the model (e.g., “Add a warm lens flare,” or “Change the car color to metallic blue”).</li>
  <li><strong>Seamless Multimodality:</strong> Eliminates the latency of feeding inputs to separate models by natively processing high-fidelity video, speech, and text simultaneously.</li>
</ul>

<hr />

<h3 id="4-google-antigravity-20">4. Google Antigravity 2.0</h3>
<p>Antigravity 2.0 is Google’s new, agent-first developer platform. It is a comprehensive suite designed to help engineers build, monitor, orchestrate, and deploy parallel multi-agent systems and agentic workflows.</p>
<ul>
  <li><strong>Standalone Desktop App:</strong> A visual, state-of-the-art developer workspace to orchestrate multi-agent environments, track agent tasks in real-time, and run interactive simulations.</li>
  <li><strong>Antigravity CLI &amp; Python SDK:</strong> Enables developers to build, test, and spin up agents programmatically directly from the command line.</li>
  <li><strong>Model Context Protocol (MCP) Support:</strong> Built-in standard protocol support, making it incredibly simple to securely connect agents to local databases, shell tools, and third-party APIs.</li>
  <li><strong>Generative App Development:</strong> Demonstration showcased the ability to construct complete apps and simple operating systems through natural language instructions.</li>
</ul>

<hr />

<h3 id="5-codemender">5. CodeMender</h3>
<p>CodeMender is an autonomous AI security and engineering agent built inside the Antigravity Agent Platform. It is used to automatically detect, analyze, patch, and rewrite critical vulnerabilities in codebases.</p>
<ul>
  <li><strong>Self-Healing Codebases:</strong> Autonomously scans local or remote code repositories for critical vulnerabilities.</li>
  <li><strong>Automatic Patch Generation &amp; Testing:</strong> Not only finds security issues but automatically drafts code patches, runs unit tests to ensure no regressions, and submits pull requests for human review.</li>
</ul>

<hr />

<h3 id="6-ask-youtube">6. Ask YouTube</h3>
<p>Ask YouTube is a new conversational search experience built into YouTube that allows users to query the actual content of videos to find specific answers without having to watch them all the way through.</p>
<ul>
  <li><strong>Time-Stamped Responses:</strong> If you ask “How do I calibrate the focus ring in this video?”, the AI answers the question in text and jumps you directly to the exact millisecond in the video where that step is shown.</li>
  <li><strong>Conversational Dialogue:</strong> Users can ask follow-up questions, summarize key takeaways of long-form podcasts, or extract ingredient lists from cooking videos.</li>
</ul>

<hr />

<h3 id="7-ask-maps">7. Ask Maps</h3>
<p>Ask Maps is a conversational, Gemini-powered assistant integrated directly within Google Maps. It allows users to query Google Maps using complex, scenario-based natural language to find location recommendations and plan itineraries without relying on restrictive keywords.</p>
<ul>
  <li><strong>Scenario-Based Inquiries:</strong> Solves complex real-world queries (e.g., “Where can I charge my EV, in the next 10 minutes, with a restaurant nearby that serves pasta?”).</li>
  <li><strong>Deep Personalization:</strong> Accounts for your saved locations, travel patterns, and past preferences to offer highly tailored recommendations.</li>
</ul>

<hr />

<h3 id="8-google-pics">8. Google Pics</h3>
<p>Google Pics is a brand-new AI design and precision image-editing tool integrated directly into Google Workspace (Docs, Slides, Drive), powered by an on-device Gemini Nano Banana model.</p>
<ul>
  <li><strong>Dynamic Canvas Editing:</strong> Allows users to modify isolated components of an image (e.g., resizing or moving an object) while AI seamlessly fills in the background behind it.</li>
  <li><strong>Workspace Productivity:</strong> Enables office workers to design professional flyers, mockups, social media graphics, and translate texts embedded in visual assets on the fly.</li>
</ul>

<hr />

<h3 id="9-docs-live">9. Docs Live</h3>
<p>Docs Live is a voice-enabled, interactive collaboration tool integrated within Google Workspace (including Google Docs, Gmail, and Google Keep). It allows users to write, draft, edit, and organize documents hands-free via real-time conversational voice dialogue.</p>
<ul>
  <li><strong>Real-Time Spoken Dictation &amp; Structuring:</strong> Converts spoken thoughts into beautifully structured, formatted outlines and paragraphs on the fly.</li>
  <li><strong>Voice-Driven Editing:</strong> Allows users to issue real-time verbal commands to refine drafts (e.g., “Change this paragraph’s tone to be more professional,” or “Insert a summary bullet list of these notes”).</li>
  <li><strong>Cross-Workspace Integration:</strong> Seamlessly search and extract context from Gmail inboxes and Google Drive files entirely through natural spoken conversations.</li>
</ul>

<hr />

<h3 id="10-universal-cart">10. Universal Cart</h3>
<p>Universal Cart is an agentic, unified shopping hub operating across Search, Gemini, YouTube, and Gmail. It allows users to shop, aggregate, compare, and check out items from multiple online retailers in one single checkout stream.</p>
<ul>
  <li><strong>Background Deal Tracking:</strong> Constantly monitors prices, applies discount codes, flags restocks, and reports historical price drops for items in your cart.</li>
  <li><strong>Universal Commerce Protocol (UCP):</strong> A new standard that allows agents to securely complete purchases on behalf of users.</li>
</ul>

<hr />

<h3 id="11-daily-brief">11. Daily Brief</h3>
<p>Daily Brief is an intelligent personal dashboard powered by Gemini that automatically digests information from your digital life to give you a highly customized, actionable start to your day.</p>
<ul>
  <li><strong>Multi-Source Triage:</strong> Aggregates and synthesizes unread emails, upcoming calendar appointments, and outstanding tasks into one comprehensive briefing.</li>
  <li><strong>Conversational Follow-ups:</strong> Proactively suggests actions (e.g., “You have an email from Sarah asking to reschedule; would you like me to move your 2:00 PM calendar block?”).</li>
</ul>

<hr />

<h3 id="12-wear-os-7--wear-widgets">12. Wear OS 7 &amp; Wear Widgets</h3>
<p>Wear OS 7 is the latest major operating system update for smartwatches, with a massive architectural upgrade centered on real-time widgets and on-device intelligence.</p>
<ul>
  <li><strong>Wear Widgets:</strong> Dynamic tiles that mirror active application states and phone-based information in real-time, rather than requiring you to open apps.</li>
  <li><strong>Gemini Smart Engine:</strong> Deep integration of Gemini to provide context-aware shortcuts and voice-driven agentic assistance directly on the wrist.</li>
</ul>

<hr />

<h3 id="13-google-intelligent-eyewear-smart-glasses">13. Google Intelligent Eyewear (Smart Glasses)</h3>
<p>Developed in collaboration with Samsung, Warby Parker, and Gentle Monster, these are sleek, audio-first smart glasses designed to provide a highly private, hands-free spoken connection to Gemini on the go.</p>
<ul>
  <li><strong>Audio-Focused Assistance:</strong> Provides real-time spoken translations, directions, and reminders quietly in your ear, eliminating the need for bulky displays or constant phone-checking.</li>
  <li><strong>Stylish Designs:</strong> Built with leading fashion brands like Warby Parker to look like premium, everyday eyewear. Launching in Fall 2026.</li>
</ul>

<hr />

<h3 id="14-tpu-8t--tpu-8i-eighth-generation-tensor-processing-units">14. TPU 8t &amp; TPU 8i (Eighth-Generation Tensor Processing Units)</h3>
<p>Google’s custom-designed eighth-generation AI accelerator chips, split into two specialized workloads: <strong>TPU 8t</strong> for massive model training and <strong>TPU 8i</strong> for real-time model inference.</p>
<ul>
  <li><strong>TPU 8t (Training Optimized):</strong> Delivers nearly 3x the raw compute of previous generations, custom-built to scale training across over one million TPUs globally using JAX and Pathways to shrink frontier model training cycles from months to weeks.</li>
  <li><strong>TPU 8i (Inference Optimized):</strong> Specifically designed to power real-time agentic workloads, optimizing energy efficiency to deliver 2x higher performance-per-watt for low-latency, scalable AI application serving.</li>
</ul>

<hr />

<h3 id="15-the-reimagined-search-box">15. The Reimagined Search Box</h3>
<p>Billed as the “biggest upgrade to the Search box in 25 years,” Google Search has evolved from a text-and-link query engine into a multi-input reasoning engine.</p>
<ul>
  <li><strong>Rich Multi-Input:</strong> Users can drag-and-drop text, images, files (such as spreadsheets), and even video files directly into the Search box to get instant, synthesized, intent-based answers.</li>
  <li><strong>Unified Desktop &amp; Mobile Experience:</strong> Fully merges AI Overviews and AI Mode into a single, seamless, interactive search stream.</li>
</ul>

<hr />

<h3 id="conclusion-welcome-to-the-future-of-technology">Conclusion: Welcome to the Future of Technology</h3>

<p>Google I/O 2026 has set a bold course. The days of treating AI like a simple search bar or a writing prompt are fading. The agentic future is here, where AI operates as a collaborative partner, running in the background to handle the tedious work of software development, shopping, and organization.</p>

<p><em>Which of these announcements are you most excited to try?</em></p>]]></content><author><name></name></author><category term="Google IO" /><category term="AI" /><category term="Tech News" /><category term="Gemini" /><category term="Software Development" /><category term="Agentic Era" /><category term="Google I/O 2026" /><category term="Gemini 3.5" /><category term="Gemini 3.5 Flash" /><category term="Antigravity 2.0" /><category term="Gemini 3.5 Pro" /><category term="Gemini 3.5 Pro Max" /><category term="Antigravity" /><category term="Android AI 15" /><category term="Google Assistant" /><category term="Google Search" /><category term="Gemini App" /><category term="Google Workspace" /><category term="Google Pics" /><category term="Docs Live" /><category term="Universal Cart" /><category term="Daily Brief" /><category term="Wear OS 7" /><category term="Google Intelligent Eyewear" /><category term="Samsung" /><category term="Warby Parker" /><category term="Gentle Monster" /><category term="TPU 8t" /><category term="TPU 8i" /><category term="Tensor Processing Units" /><category term="JAX" /><category term="Pathways" /><category term="AI Overviews" /><category term="AI Mode" /><category term="CodeMender" /><summary type="html"><![CDATA[Every year, Google I/O serves as a compass for the tech industry, charting the course for the next generation of consumer experiences but this time it marked a massive paradigm shift.]]></summary></entry><entry><title type="html">Macbook Terminal Setup</title><link href="https://amoldighe.github.io/2026/05/15/macbook-setup/" rel="alternate" type="text/html" title="Macbook Terminal Setup" /><published>2026-05-15T00:00:00+00:00</published><updated>2026-05-15T00:00:00+00:00</updated><id>https://amoldighe.github.io/2026/05/15/macbook-setup</id><content type="html" xml:base="https://amoldighe.github.io/2026/05/15/macbook-setup/"><![CDATA[<p>Recently I setup a new MacBook Pro, this gave me a chance to revist my command line setup and the necessary tools I use on a daily basis to speed up my development workflow.</p>

<h3 id="install-homebrew">Install Homebrew</h3>

<p><a href="https://brew.sh/">Homebrew</a> allow you to install software on your Mac using the command line.</p>

<div class="language-plaintext highlighter-rouge"><div class="highlight"><pre class="highlight"><code>/bin/bash -c "$(curl -fsSL https://raw.githubusercontent.com/Homebrew/install/HEAD/install.sh)"
</code></pre></div></div>

<h3 id="install-iterm2">Install iTerm2</h3>

<p>iTerm2 is a terminal emulator for macOS. It is a replacement for the default terminal application.</p>

<div class="language-plaintext highlighter-rouge"><div class="highlight"><pre class="highlight"><code>brew install --cask iterm2
</code></pre></div></div>

<h3 id="install-git">Install git</h3>

<p>Git is a version control system for tracking changes in source code during software development. Git is pre installed on macOS. You can verify it by running <code class="language-plaintext highlighter-rouge">git --version</code> command.</p>

<h3 id="install-oh-my-zsh">Install oh my zsh</h3>

<p><a href="https://ohmyz.sh/#install">Oh My Zsh</a> is an open-source framework for managing your Zsh configuration. It includes a collection of community-maintained plugins and themes.</p>

<div class="language-plaintext highlighter-rouge"><div class="highlight"><pre class="highlight"><code>sh -c "$(curl -fsSL https://raw.githubusercontent.com/ohmyzsh/ohmyzsh/master/tools/install.sh)"
</code></pre></div></div>

<p><strong>Useful Plugins for Oh My Zsh</strong></p>

<ul>
  <li>zsh-autosuggestions
https://github.com/zsh-users/zsh-autosuggestions/blob/master/INSTALL.md</li>
</ul>

<div class="language-plaintext highlighter-rouge"><div class="highlight"><pre class="highlight"><code>git clone https://github.com/zsh-users/zsh-autosuggestions ${ZSH_CUSTOM:-~/.oh-my-zsh/custom}/plugins/zsh-autosuggestions

</code></pre></div></div>

<ul>
  <li>zsh-syntax-highlighting
https://github.com/zsh-users/zsh-syntax-highlighting/blob/master/INSTALL.md</li>
</ul>

<div class="language-plaintext highlighter-rouge"><div class="highlight"><pre class="highlight"><code>git clone https://github.com/zsh-users/zsh-syntax-highlighting.git ${ZSH_CUSTOM:-~/.oh-my-zsh/custom}/plugins/zsh-syntax-highlighting
</code></pre></div></div>

<ul>
  <li>web-search</li>
</ul>

<p>Edit file <code class="language-plaintext highlighter-rouge">~/.zshrc</code> and add plugins to the line with <code class="language-plaintext highlighter-rouge">plugins=(...)</code>.</p>

<div class="language-plaintext highlighter-rouge"><div class="highlight"><pre class="highlight"><code>plugins=(git web-search zsh-autosuggestions zsh-syntax-highlighting)
</code></pre></div></div>

<p><code class="language-plaintext highlighter-rouge">source .zshrc</code> to activate the plugins</p>

<p>Homebrew formulae are also available to install the plugins</p>

<div class="language-plaintext highlighter-rouge"><div class="highlight"><pre class="highlight"><code>brew install zsh-autosuggestions
brew install zsh-syntax-highlighting
</code></pre></div></div>
<p>I prefer the above <code class="language-plaintext highlighter-rouge">git clone</code> + <code class="language-plaintext highlighter-rouge">~/.zshrc</code> approch</p>

<h3 id="install-starship-prompt">Install starship prompt</h3>

<div class="language-plaintext highlighter-rouge"><div class="highlight"><pre class="highlight"><code>brew install starship
</code></pre></div></div>

<p>I will be using an existing preset of startship prompt <a href="https://starship.rs/presets/tokyo-night">https://starship.rs/presets/tokyo-night</a> which needs Nerd font to be installed. List of all the Nerd fonts can be found here: <a href="https://www.nerdfonts.com/font-downloads">https://www.nerdfonts.com/font-downloads</a></p>

<p>Here’s a quick command to list all the available nerd fonts and install</p>

<div class="language-plaintext highlighter-rouge"><div class="highlight"><pre class="highlight"><code>brew search '/font-.*-nerd-font/' 
brew install --cask &lt;font-name&gt;
</code></pre></div></div>

<p>Example for installing JetBrains Mono Nerd Font</p>

<div class="language-plaintext highlighter-rouge"><div class="highlight"><pre class="highlight"><code>brew install --cask font-jetbrains-mono-nerd-font
</code></pre></div></div>
<p>To enable this font in iterm2 follow these steps:</p>

<ul>
  <li>Open iterm2</li>
  <li>Go to Preferences -&gt; Profiles -&gt; Text</li>
  <li>Click on “Change Font” and select “JetBrains Mono Nerd Font”</li>
</ul>

<p>I like Tokyo Night theme for starship prompt. You can find more presets here: <a href="https://starship.rs/presets/">https://starship.rs/presets/</a> 
Use starship to import the preset for <a href="https://starship.rs/presets/tokyo-night">https://starship.rs/presets/tokyo-night</a></p>

<div class="language-plaintext highlighter-rouge"><div class="highlight"><pre class="highlight"><code>starship preset tokyo-night -o ~/.config/starship.toml
</code></pre></div></div>

<h3 id="install-carapace">Install carapace</h3>

<p><a href="https://carapace.sh/">Carapace</a> is a shell completion generator for commands. It allows you to generate completion scripts for your shell.</p>

<div class="language-plaintext highlighter-rouge"><div class="highlight"><pre class="highlight"><code>brew install carapace
</code></pre></div></div>

<p>Setup carapace to work with zsh - <a href="https://carapace-sh.github.io/carapace-bin/setup.html#zsh">https://carapace-sh.github.io/carapace-bin/setup.html#zsh</a></p>

<p>Edit <code class="language-plaintext highlighter-rouge">.zshrc</code> file and add the following lines:</p>

<div class="language-plaintext highlighter-rouge"><div class="highlight"><pre class="highlight"><code>autoload -U compinit &amp;&amp; compinit
export CARAPACE_BRIDGES='zsh,fish,bash,inshellisense' # optional
zstyle ':completion:*' format $'\e[2;37mCompleting %d\e[m'
source &lt;(carapace _carapace)
</code></pre></div></div>

<p><code class="language-plaintext highlighter-rouge">source .zshrc</code> to activate the changes &amp; enjoy the carapace autocompletion feature for all the tools you installed using brew (and lots of other tools).</p>

<h3 id="install-fzf">Install fzf</h3>

<p><a href="https://github.com/junegunn/fzf">fzf</a> is a general-purpose command-line fuzzy finder.</p>

<div class="language-plaintext highlighter-rouge"><div class="highlight"><pre class="highlight"><code>brew install fzf
</code></pre></div></div>

<h3 id="install-tmux">Install tmux</h3>

<p><a href="https://github.com/tmux/tmux">tmux</a> is a terminal multiplexer. It lets you switch easily between several programs in one terminal, detach them (they keep running in the background) and reattach them to a different terminal.</p>

<div class="language-plaintext highlighter-rouge"><div class="highlight"><pre class="highlight"><code>brew install tmux
</code></pre></div></div>

<p>This one is more useful on production servers. But good to have it installed locally on Mac as well.</p>]]></content><author><name></name></author><category term="Mac" /><category term="Terminal" /><category term="zsh" /><category term="ohmyzsh" /><category term="starship" /><category term="carapace" /><category term="fzf" /><category term="tmux" /><category term="brew" /><category term="iterm2" /><category term="git" /><summary type="html"><![CDATA[Recently I setup a new MacBook Pro, this gave me a chance to revist my command line setup and the necessary tools I use on a daily basis to speed up my development workflow.]]></summary></entry><entry><title type="html">Postgres Disk &amp;amp; WAL</title><link href="https://amoldighe.github.io/2026/04/09/postgres-wal/" rel="alternate" type="text/html" title="Postgres Disk &amp;amp; WAL" /><published>2026-04-09T00:00:00+00:00</published><updated>2026-04-09T00:00:00+00:00</updated><id>https://amoldighe.github.io/2026/04/09/postgres-wal</id><content type="html" xml:base="https://amoldighe.github.io/2026/04/09/postgres-wal/"><![CDATA[<p>Why is there size difference in my postgres cluster data directory?</p>

<p>I have a postgres patroni cluster with 3 nodes. Each node has a seperate data directory for postgres.</p>

<p>While verifiying the status of the cluster it was noticed that the cluster replica were stuck in a <code class="language-plaintext highlighter-rouge">starting</code> state.</p>

<div class="language-plaintext highlighter-rouge"><div class="highlight"><pre class="highlight"><code>[root@postgres-poc-node-3:~]# patronictl list
+ Cluster: postgres-poc-node (7587706677345667891) -------------------------+---------+----------+-----+-------------+-----+------------+-----+
| Member                             | Host                                                | Role    | State    |  TL | Receive LSN | Lag | Replay LSN | Lag |
+------------------------------------+-----------------------------------------------------+---------+----------+-----+-------------+-----+------------+-----+
| postgres-poc-node-1 | postgres-poc-node-1.localhost:5432 | Replica | starting |     |     unknown |     |    unknown |     |
| postgres-poc-node-2 | postgres-poc-node-2.localhost:5432 | Replica | starting |     |     unknown |     |    unknown |     |
| postgres-poc-node-3 | postgres-poc-node-3.localhost:5432 | Leader  | running  | 135 |             |     |            |     |
+------------------------------------+-----------------------------------------------------+---------+----------+-----+-------------+-----+------------+-----+
</code></pre></div></div>

<p>Each of the replica nodes had to be reinitialized to bring them back to a running state.</p>

<div class="language-plaintext highlighter-rouge"><div class="highlight"><pre class="highlight"><code>[root@postgres-poc-node-2:~]# patronictl reinit postgres-poc-node postgres-poc-node-2
+ Cluster: postgres-poc-node (7587706677345667891) -------------------------+---------+----------+-----+-------------+-----+------------+-----+
| Member                             | Host                                                | Role    | State    |  TL | Receive LSN | Lag | Replay LSN | Lag |
+------------------------------------+-----------------------------------------------------+---------+----------+-----+-------------+-----+------------+-----+
| postgres-poc-node-1 | postgres-poc-node-1.localhost:5432 | Replica | starting |     |     unknown |     |    unknown |     |
| postgres-poc-node-2 | postgres-poc-node-2.localhost:5432 | Replica | starting |     |     unknown |     |    unknown |     |
| postgres-poc-node-3 | postgres-poc-node-3.localhost:5432 | Leader  | running  | 135 |             |     |            |     |
+------------------------------------+-----------------------------------------------------+---------+----------+-----+-------------+-----+------------+-----+
Are you sure you want to reinitialize members postgres-poc-node-2? [y/N]: y
Success: reinitialize for member postgres-poc-node-2
</code></pre></div></div>

<p>Once all the replica nodes were back online, I noticed that the data directory size on the replica nodes was significantly smaller than the leader node.</p>

<ul>
  <li>leader node</li>
</ul>

<div class="language-plaintext highlighter-rouge"><div class="highlight"><pre class="highlight"><code>[root@postgres-poc-node-3:~]# du -sh /var/lib/postgresql/*/* | sort -h | tail -20
4.0K	/var/lib/postgresql/17/pg_stat_tmp
4.0K	/var/lib/postgresql/17/pg_tblspc
4.0K	/var/lib/postgresql/17/pg_twophase
4.0K	/var/lib/postgresql/17/PG_VERSION
4.0K	/var/lib/postgresql/17/postgresql.auto.conf
4.0K	/var/lib/postgresql/17/postgresql.conf
4.0K	/var/lib/postgresql/17/postgresql.conf.backup
4.0K	/var/lib/postgresql/17/postmaster.opts
4.0K	/var/lib/postgresql/17/postmaster.pid
4.0K	/var/lib/postgresql/patroni/pgpass
16K	/var/lib/postgresql/17/pg_logical
20K	/var/lib/postgresql/17/pg_replslot
32K	/var/lib/postgresql/17/postgresql.base.conf
32K	/var/lib/postgresql/17/postgresql.base.conf.backup
52K	/var/lib/postgresql/17/pg_multixact
600K	/var/lib/postgresql/17/global
15M	/var/lib/postgresql/17/pg_xact
31M	/var/lib/postgresql/17/pg_subtrans
3.3G	/var/lib/postgresql/17/base
16G	/var/lib/postgresql/17/pg_wal
</code></pre></div></div>

<ul>
  <li>replica node</li>
</ul>

<div class="language-plaintext highlighter-rouge"><div class="highlight"><pre class="highlight"><code>[root@postgres-poc-node-2:~]# du -sh /var/lib/postgresql/*/* | sort -h | tail -20
4.0K	/var/lib/postgresql/17/pg_tblspc
4.0K	/var/lib/postgresql/17/pg_twophase
4.0K	/var/lib/postgresql/17/PG_VERSION
4.0K	/var/lib/postgresql/17/postgresql.auto.conf
4.0K	/var/lib/postgresql/17/postgresql.conf
4.0K	/var/lib/postgresql/17/postgresql.conf.backup
4.0K	/var/lib/postgresql/17/postmaster.opts
4.0K	/var/lib/postgresql/17/postmaster.pid
4.0K	/var/lib/postgresql/patroni/pgpass
16K	/var/lib/postgresql/17/pg_logical
20K	/var/lib/postgresql/17/pg_replslot
28K	/var/lib/postgresql/17/pg_subtrans
32K	/var/lib/postgresql/17/postgresql.base.conf
32K	/var/lib/postgresql/17/postgresql.base.conf.backup
52K	/var/lib/postgresql/17/pg_multixact
232K	/var/lib/postgresql/17/backup_manifest
568K	/var/lib/postgresql/17/global
15M	/var/lib/postgresql/17/pg_xact
33M	/var/lib/postgresql/17/pg_wal
3.3G	/var/lib/postgresql/17/base
</code></pre></div></div>

<p><code class="language-plaintext highlighter-rouge">base</code> contains the actual table and index files. Both nodes have about 3.3 GB there, so the actual database contents are roughly identical.</p>

<p>The large difference is entirely from <code class="language-plaintext highlighter-rouge">pg_wal</code>:</p>

<ul>
  <li>Leader: 16 GB WAL retained</li>
  <li>Replica: 33 MB WAL retained</li>
</ul>

<p>This is expected because replicas replay WAL and discard old WAL locally, while the leader must retain WAL for replicas, crash recovery, PITR, and replication slots.</p>

<p>Write-Ahead Logging is PostgreSQL’s durability and replication mechanism.</p>

<p>Basic idea:</p>

<ul>
  <li>A client changes data:
<code class="language-plaintext highlighter-rouge">update orders set status='done' where id=10;</code></li>
  <li>PostgreSQL first writes a WAL record describing the change into pg_wal</li>
  <li>Only after WAL is safely flushed does PostgreSQL consider the transaction committed</li>
  <li>Later, the actual table file in base/ is updated</li>
</ul>

<p>This is called “write-ahead” because WAL is written before the actual data files.</p>

<p>Why this exists?</p>

<ul>
  <li>crash recovery</li>
  <li>replication</li>
  <li>point-in-time recovery</li>
  <li>consistency during restart</li>
</ul>

<p>In this case as the replication was broken for a long time hence the leader node had to retain all the WAL files for the replicas to catch up.</p>

<p>Once the cluster was healthy again the replicas started catching up and the WAL files were discarded from the leader node.</p>

<div class="language-plaintext highlighter-rouge"><div class="highlight"><pre class="highlight"><code>[root@postgres-poc-node-3:~]# patronictl list
+ Cluster: postgres-poc-node (7587706677345667891) -------------------------+---------+-----------+-----+-------------+-----+------------+-----+
| Member                             | Host                                                | Role    | State     |  TL | Receive LSN | Lag | Replay LSN | Lag |
+------------------------------------+-----------------------------------------------------+---------+-----------+-----+-------------+-----+------------+-----+
| postgres-poc-node-1 | postgres-poc-node-1.localhost:5432 | Replica | streaming | 135 |  D/7F9BD988 |   0 |    unknown |     |
| postgres-poc-node-2 | postgres-poc-node-2.localhost:5432 | Replica | streaming | 135 |  D/7F9BD988 |   0 | D/7F9BD988 |   0 |
| postgres-poc-node-3 | postgres-poc-node-3.localhost:5432 | Leader  | running   | 135 |             |     |            |     |
+------------------------------------+-----------------------------------------------------+---------+-----------+-----+-------------+-----+------------+-----+

[root@postgres-poc-node-3:~]# du -sh /var/lib/postgresql/*/* | sort -h | tail -20
4.0K	/var/lib/postgresql/17/pg_stat_tmp
4.0K	/var/lib/postgresql/17/pg_tblspc
4.0K	/var/lib/postgresql/17/pg_twophase
4.0K	/var/lib/postgresql/17/PG_VERSION
4.0K	/var/lib/postgresql/17/postgresql.auto.conf
4.0K	/var/lib/postgresql/17/postgresql.conf
4.0K	/var/lib/postgresql/17/postgresql.conf.backup
4.0K	/var/lib/postgresql/17/postmaster.opts
4.0K	/var/lib/postgresql/17/postmaster.pid
4.0K	/var/lib/postgresql/patroni/pgpass
16K	/var/lib/postgresql/17/pg_logical
20K	/var/lib/postgresql/17/pg_replslot
28K	/var/lib/postgresql/17/pg_subtrans
32K	/var/lib/postgresql/17/postgresql.base.conf
32K	/var/lib/postgresql/17/postgresql.base.conf.backup
52K	/var/lib/postgresql/17/pg_multixact
600K	/var/lib/postgresql/17/global
15M	/var/lib/postgresql/17/pg_xact
337M	/var/lib/postgresql/17/pg_wal
3.3G	/var/lib/postgresql/17/base
</code></pre></div></div>]]></content><author><name></name></author><category term="Postgres" /><category term="Database" /><category term="RDBMS" /><category term="ACID" /><category term="Transaction" /><category term="Isolation" /><category term="Durability" /><category term="MVCC" /><category term="WAL" /><summary type="html"><![CDATA[Why is there size difference in my postgres cluster data directory?]]></summary></entry><entry><title type="html">GitHub Agentic Workflow</title><link href="https://amoldighe.github.io/2026/04/03/github-agentic-workflow/" rel="alternate" type="text/html" title="GitHub Agentic Workflow" /><published>2026-04-03T00:00:00+00:00</published><updated>2026-04-03T00:00:00+00:00</updated><id>https://amoldighe.github.io/2026/04/03/github-agentic-workflow</id><content type="html" xml:base="https://amoldighe.github.io/2026/04/03/github-agentic-workflow/"><![CDATA[<p>The focus of this post is github agentic workflow. Before we dive into it lets brush through basics of Github Events &amp; Actions.</p>

<p><strong>GitHub Events</strong></p>

<p>An event is any significant action performed on GitHub, ranging from code changes to administrative updates. Common examples include:
    Push: When code is pushed to a branch.
    Pull Request: When a pull request is created, updated, or merged.
    Issues: When an issue is opened, edited, or labeled.
    Release: When a new software release is published.
    Scheduled Events: Using cron syntax to run tasks at specific times (e.g., nightly builds).
    Manual Triggers: Using workflow_dispatch to start a workflow manually through the UI or API.</p>

<p><strong>GitHub Actions</strong></p>

<p>A powerful and flexible automation platform provided by GitHub that allows developers to automate tasks directly within their repositories. It is commonly used to implement CI/CD pipelines that build and test code on every pull request and deploy merged code to production. It can also   automate any repository action by listening to various events such as code pushes, issue creation, pull request updates, or package registry events.</p>

<ul>
  <li>Workflow &amp; Job</li>
</ul>

<p>The core component of GitHub Actions, representing an automated process capable of executing one or more tasks. Workflows are defined using YAML files stored in the .github/workflows directory of a repository. A workflow runs in response to a specific event, such as a code push or a manual trigger.
A workflow consists of one or more jobs. Each job contains a series of individual steps (e.g., cloning code, installing dependencies, running tests) that are executed in series. Multiple jobs within a single workflow can run in parallel by default.</p>

<ul>
  <li>Github Runners</li>
</ul>

<p>A runner is a server (usually a virtual machine) that is responsible for executing the steps defined in a job. GitHub automatically provisions a runner for each job based on the runs-on configuration specified in the YAML file. Users can access real-time logs, outputs, and artifacts for every step executed on a runner through the GitHub UI.</p>

<p>Here’s a simple example of a GitHub Actions workflow - <a href="https://github.com/amoldighe/pytest/blob/main/.github/workflows/python-test.yaml">https://github.com/amoldighe/pytest/blob/main/.github/workflows/python-test.yaml</a></p>

<p><strong>How Github Events Associate with GitHub Actions</strong></p>

<p>The relationship between events and actions is defined within a Workflow file (a YAML file located in .github/workflows).</p>

<ul>
  <li>
    <p>The “on” Key: You use the on keyword in your YAML configuration to specify which event(s) should trigger the automation. For example, on: push tells GitHub to run the workflow every time code is uploaded.</p>
  </li>
  <li>
    <p>Filtering: You can refine how an event triggers an action by adding filters. For instance, you can specify that a workflow should only run on a push to the main branch.</p>
  </li>
  <li>
    <p>Contextual Information: When an event triggers a workflow, GitHub provides “event context” to the runner. This data includes details like who initiated the event, the branch name, and the commit ID, which the action can use to perform its tasks (like posting a comment on the specific issue that was just opened).</p>
  </li>
</ul>

<p>In summary, GitHub Events act as the “sensor” that detects activity, while GitHub Actions provide the “response” or logic that executes in reaction to that activity.</p>

<p><strong>What is Agentic Workflow?</strong></p>

<p>Github supports agentic workflow through Github Actions with a paid Github subscription, specifically one with an active GitHub Copilot subscription. While the underlying GitHub Actions (which execute the workflows) have a free tier, the AI agents that power the automation depend on premium Copilot requests to function, with each run often consuming multiple requests.</p>

<p>Instead we will implement the agentic workflow using Github Actions and Openrouter API.</p>

<p><strong>What is Openrouter?</strong></p>

<p><a href="https://openrouter.ai/models">OpenRouter</a> is an API platform that provides access to various AI models from different providers through a unified interface. It allows developers to use different AI models with a single API key and pricing structure. It supports various AI models including OpenAI, Anthropic, Google, and many more. Best part about openrouter is that it provides free tier for using various AI models. For this example I will be using the free tire of Openrouter for PR review agent.</p>

<p><strong>How to create a PR review agent?</strong></p>

<p>I am setting up a workflow which will be triggered when a pull request is opened or updated. It uses github action to get the diff of the pull request and then sends it to the openrouter API for review. The review is then posted as a comment on the pull request.</p>

<p>The workflow YAML - <a href="https://github.com/amoldighe/pytest/blob/main/.github/workflows/pr-review.yaml">https://github.com/amoldighe/pytest/blob/main/.github/workflows/pr-review.yaml</a> leverages <a href="https://github.com/marketplace/actions/diffguard-ai-pr-review">DiffGuard AI PR Review</a> action from github marketplace.</p>

<div class="language-plaintext highlighter-rouge"><div class="highlight"><pre class="highlight"><code>      - name: AI PR Review
        uses: jonit-dev/openrouter-github-action@main
        with:
          # Required inputs
          github_token: $ # Automatically provided
          open_router_key: $ # Must be set in repository secrets

          # Optional inputs with defaults
          model_id: 'google/gemma-3-27b-it:free' # Default model
          max_tokens: '2048' # Default max tokens
          review_label: 'ai-review' # Optional: Only review PRs with this label

          # Optional custom prompt
          custom_prompt: |
            You are a security-focused reviewer. Analyze this PR with emphasis on:
</code></pre></div></div>

<p>The Openrouter API key need to be setup as part of your repository secrets and variables &amp; refrenced in the workflow YAML file. On using the label <code class="language-plaintext highlighter-rouge">ai-review</code> on the pull request the workflow will be triggered.</p>

<p>Here’s a sample output of the PR review analyzed using model google/gemma-3-27b-it</p>

<p><img src="/img/github-actions-pr.png" /></p>

<p>Details can be viewed on this PR - <a href="https://github.com/amoldighe/pytest/pull/6">https://github.com/amoldighe/pytest/pull/6</a></p>]]></content><author><name></name></author><category term="GitHub" /><category term="Actions" /><category term="AI" /><category term="Development" /><category term="Skills" /><category term="Openrouter" /><category term="Github Actions" /><category term="Github Events" /><category term="Github Runners" /><category term="Github Workflow" /><summary type="html"><![CDATA[The focus of this post is github agentic workflow. Before we dive into it lets brush through basics of Github Events &amp; Actions.]]></summary></entry><entry><title type="html">OpenCode, Agents &amp;amp; Skills</title><link href="https://amoldighe.github.io/2026/03/20/opencode-agents-skill/" rel="alternate" type="text/html" title="OpenCode, Agents &amp;amp; Skills" /><published>2026-03-20T00:00:00+00:00</published><updated>2026-03-20T00:00:00+00:00</updated><id>https://amoldighe.github.io/2026/03/20/opencode-agents-skill</id><content type="html" xml:base="https://amoldighe.github.io/2026/03/20/opencode-agents-skill/"><![CDATA[<p>In the rapidly evolving landscape of AI-assisted software development, <strong>OpenCode</strong> has emerged as a significant player, particularly with its focus on <strong>agents</strong> and <strong>skills</strong>. This post delves into what these components are, how they function within the OpenCode ecosystem, and why they matter for developers looking to leverage AI more effectively.</p>

<p><strong>What is OpenCode?</strong></p>

<p>Opencode is an open-source AI agent designed to help plan, implement, debug, and refactor entire codebases autonomously. Unlike traditional coding assistants that only autocomplete code or generate passive snippets in a chat window, OpenCode operates primarily through a continuous “agentic loop.” This means it can actively explore your file system, execute terminal commands, and modify code independently to achieve a complex goal.</p>

<p>Opencode supports a wide variety of state-of-the-art AI models—from proprietary giants like Claude, OpenAI, and Gemini, to powerful locally-hosted models. Through its modular architecture of “Agents” and “Skills,” developers can seamlessly create and share highly specialized workflows that are perfectly tailored to their specific tech stacks and organizational standards.</p>

<p>Install Opencode - <a href="https://opencode.ai/">https://opencode.ai/</a></p>

<p>In <strong>OpenCode</strong>, agents are specialized AI assistants configured to handle specific tasks, workflows, and operations throughout the code  development lifecycle. Instead of using a single monolithic AI for everything, OpenCode allows developers to define and use multiple targeted agents that possess custom prompts, utilize different underlying AI models, and have explicitly defined tool access.</p>

<p>Here is a breakdown of how agents in OpenCode work:</p>

<h2 id="1-types-of-agents">1. Types of Agents</h2>

<ul>
  <li>
    <p><strong>Primary Agents</strong>: These are the main assistants you interact with directly in your workflow. Standard examples include the <strong>“Build”</strong> agent (a full-access AI for writing, modifying, and executing code) and the <strong>“Plan”</strong> agent (a read-only AI used for code analysis, architecture design, and exploration).</p>
  </li>
  <li>
    <p><strong>Subagents</strong>: These are specialized “worker” assistants that primary agents can seamlessly invoke when they encounter a specific or complex sub-task (e.g., a subagent dedicated purely to advanced web searching or analyzing specific logs).</p>
  </li>
</ul>

<h2 id="2-tools-and-automation-the-agentic-loop">2. Tools and Automation (The Agentic Loop)</h2>
<p>OpenCode agents operate on an <strong>“agentic loop.”</strong> This means they don’t just predict text—they autonomously analyze a goal, decide which tools to use, execute actions, read the results, and iterate until the task is complete. Their standard toolset includes:</p>
<ul>
  <li><strong>File Operations</strong>: Reading, writing, and precisely modifying logic in your workspace.</li>
  <li><strong>Terminal Execution</strong>: Running bash commands, scripts, and tests.</li>
  <li><strong>LSP Diagnostics</strong>: Checking for syntax and linting errors using the Language Server Protocol.</li>
  <li><strong>Web Fetching</strong>: Pulling in external context, APIs, or documentation from the internet.</li>
</ul>

<h2 id="3-agent-configuration">3. Agent Configuration</h2>
<p>Agents are highly customizable and can be configured using an <code class="language-plaintext highlighter-rouge">opencode.json</code> file or Markdown specs. You can control:</p>
<ul>
  <li>Their specific <strong>role</strong> and system prompt.</li>
  <li>Allowed <strong>tools</strong> (e.g., restricting an agent from running bash commands to keep it safely read-only).</li>
  <li>The <strong>AI Model</strong> they use (OpenCode is provider-agnostic and prevents vendor lock-in, supporting Claude, OpenAI, Gemini, or locally hosted open-source models).</li>
  <li>The <strong>Temperature</strong> (controlling how creative or deterministic the agent’s output is).</li>
</ul>

<p>An OpenCode custom agent using a Markdown file (.md) containing a YAML front matter contaning metadata such as name, description, mode (primary/sub), model, temperature, and tool access (e.g., bash: false, write: true) and instructions.</p>

<p>example of an agent in opencode:</p>
<div class="language-yaml highlighter-rouge"><div class="highlight"><pre class="highlight"><code><span class="s">(base)  ~/.opencode/agents/ cat coding-review.md</span>
<span class="nn">---</span>
<span class="na">id</span><span class="pi">:</span> <span class="s">coding-review</span>
<span class="na">name</span><span class="pi">:</span> <span class="s">Coding Review</span>
<span class="na">description</span><span class="pi">:</span> <span class="s2">"</span><span class="s">Multi-language</span><span class="nv"> </span><span class="s">review</span><span class="nv"> </span><span class="s">agent</span><span class="nv"> </span><span class="s">for</span><span class="nv"> </span><span class="s">modular</span><span class="nv"> </span><span class="s">and</span><span class="nv"> </span><span class="s">functional</span><span class="nv"> </span><span class="s">coding"</span>
<span class="na">category</span><span class="pi">:</span> <span class="s">development</span>
<span class="na">type</span><span class="pi">:</span> <span class="s">standard</span>
<span class="na">version</span><span class="pi">:</span> <span class="s">1.0.0</span>
<span class="na">author</span><span class="pi">:</span> <span class="s">opencode</span>
<span class="na">mode</span><span class="pi">:</span> <span class="s">primary</span>
<span class="na">temperature</span><span class="pi">:</span> <span class="m">0.1</span>
<span class="na">tools</span><span class="pi">:</span>
  <span class="na">read</span><span class="pi">:</span> <span class="no">true</span>
  <span class="na">edit</span><span class="pi">:</span> <span class="no">false</span>
  <span class="na">write</span><span class="pi">:</span> <span class="no">false</span>
<span class="nn">---</span>

<span class="c1"># Code Review Agent</span>
<span class="s">Always start with phrase "CODING REVIEW..."</span>

<span class="na">Focus</span><span class="pi">:</span>
<span class="s">You are a coding specialist focused on writing clean, maintainable, and scalable code. Your role is to review code using modular and functional programming principles.</span>

<span class="s">Adapt to the project's language based on the files you encounter (TypeScript, Python, Go, Rust, etc.).</span>

<span class="s">Core Responsibilities</span>
<span class="na">Implement applications with focus on</span><span class="pi">:</span>

<span class="pi">-</span> <span class="s">Modular architecture design</span>
<span class="pi">-</span> <span class="s">check for potential bugs &amp; edge case</span>
<span class="pi">-</span> <span class="s">Clean code principles</span>
<span class="pi">-</span> <span class="s">Security consideration</span>
</code></pre></div></div>

<p>Running the above Coding Review agent on a python project using one of Opencode free model gave the following output:</p>

<p><img src="/img/opencode-coding-review.png" /></p>

<h2 id="4-collaboration-and-skills">4. Collaboration and “Skills”</h2>
<p>Agents in OpenCode can collaborate with one another, handing off tasks when specialized knowledge is needed. Furthermore, OpenCode incorporates <strong>Agentic Skills</strong>—reusable instructions and capability modules that you can attach to an agent. This teaches the agent exactly how to handle specialized frameworks, specific codebases, or distinct organizational patterns without having to rewrite custom prompts every time.</p>

<p>Skills allows Opencode to act as an specialist in specific areas. Without skills, every conversation starts from zero. You explain the same conventions and correct the same mistakes. Every morning, back to zero.</p>

<p>Here an example plan writing skill add to Opencode agent - <a href="https://github.com/obra/superpowers/blob/main/skills/writing-plans/SKILL.md">https://github.com/obra/superpowers/blob/main/skills/writing-plans/SKILL.md</a></p>

<div class="language-plaintext highlighter-rouge"><div class="highlight"><pre class="highlight"><code>(base)  ~/.opencode/skills/writing-plan/ ls -lth
total 24
-rw-r--r--@ 1 amol.di  staff   1.7K 21 Mar 01:11 plan-document-reviewer-prompt.md
-rw-r--r--@ 1 amol.di  staff   5.3K 21 Mar 00:55 SKILL.md
</code></pre></div></div>

<p>In Opencode the required skill needs to be loaded before use.</p>

<p><img src="/img/opencode-skill.png" /></p>

<p>In short, OpenCode agents and skills act as a modular, autonomous engineering team living within your terminal or IDE, each precisely tailored to perform specific development duties efficiently.</p>]]></content><author><name></name></author><category term="OpenCode" /><category term="Agents" /><category term="AI" /><category term="Development" /><category term="Skills" /><summary type="html"><![CDATA[In the rapidly evolving landscape of AI-assisted software development, OpenCode has emerged as a significant player, particularly with its focus on agents and skills. This post delves into what these components are, how they function within the OpenCode ecosystem, and why they matter for developers looking to leverage AI more effectively.]]></summary></entry><entry><title type="html">PostgreSQL Fundamentals - Configuration &amp;amp; Structure</title><link href="https://amoldighe.github.io/2026/03/16/postgres-fundamentals-2/" rel="alternate" type="text/html" title="PostgreSQL Fundamentals - Configuration &amp;amp; Structure" /><published>2026-03-16T00:00:00+00:00</published><updated>2026-03-16T00:00:00+00:00</updated><id>https://amoldighe.github.io/2026/03/16/postgres-fundamentals-2</id><content type="html" xml:base="https://amoldighe.github.io/2026/03/16/postgres-fundamentals-2/"><![CDATA[<p>This is a continuation of my effort to explore and understand Postgres. In this post I will be covering important configuration and its database structure.</p>

<h2 id="connection-settings">Connection Settings</h2>

<h3 id="max_connections">max_connections</h3>
<p>Maximum number of concurrent client connections. Each connection consumes memory, so balance this with available RAM.</p>

<div class="language-conf highlighter-rouge"><div class="highlight"><pre class="highlight"><code><span class="n">max_connections</span> = <span class="m">100</span>
</code></pre></div></div>

<p>Higher values require more memory per connection. Consider using connection pooling (PgBouncer, PgPool) for high-volume applications.</p>

<hr />

<h2 id="memory-settings">Memory Settings</h2>

<h3 id="shared_buffers">shared_buffers</h3>
<p>Memory used for caching table data. This is the most critical setting for performance.</p>

<div class="language-conf highlighter-rouge"><div class="highlight"><pre class="highlight"><code><span class="n">shared_buffers</span> = <span class="m">128</span><span class="n">MB</span>
</code></pre></div></div>

<p><strong>Recommended</strong>: 25% of available RAM. PostgreSQL also uses OS cache, so leaving memory for the OS is important.</p>

<h3 id="effective_cache_size">effective_cache_size</h3>
<p>Hint to the query planner about how much memory is available for caching. Helps the planner make better decisions.</p>

<div class="language-conf highlighter-rouge"><div class="highlight"><pre class="highlight"><code><span class="n">effective_cache_size</span> = <span class="m">4</span><span class="n">GB</span>
</code></pre></div></div>

<p><strong>Recommended</strong>: 75% of available RAM. This doesn’t allocate memory - it just advises the planner.</p>

<h3 id="maintenance_work_mem">maintenance_work_mem</h3>
<p>Memory for maintenance operations like VACUUM, CREATE INDEX, and ALTER TABLE.</p>

<div class="language-conf highlighter-rouge"><div class="highlight"><pre class="highlight"><code><span class="n">maintenance_work_mem</span> = <span class="m">64</span><span class="n">MB</span>
</code></pre></div></div>

<p><strong>Recommended</strong>: 512MB-1GB for heavy maintenance.</p>

<h3 id="work_mem">work_mem</h3>
<p>Memory per query operation (sorting, hash joins, bitmap operations).</p>

<div class="language-conf highlighter-rouge"><div class="highlight"><pre class="highlight"><code><span class="n">work_mem</span> = <span class="m">4</span><span class="n">MB</span>
</code></pre></div></div>

<p>A complex query may use multiple work_mem allocations. Increase if you have complex queries with sorts/hashes.</p>

<hr />

<h2 id="write-ahead-log-wal-settings">Write Ahead Log (WAL) Settings</h2>

<h3 id="wal_buffers">wal_buffers</h3>
<p>Memory for WAL data before writing to disk.</p>

<div class="language-conf highlighter-rouge"><div class="highlight"><pre class="highlight"><code><span class="n">wal_buffers</span> = -<span class="m">1</span>  <span class="c"># Auto-tuned (recommended)
</span></code></pre></div></div>

<p>The default (-1) lets PostgreSQL auto-tune based on shared_buffers.</p>

<h3 id="min_wal_size--max_wal_size">min_wal_size / max_wal_size</h3>
<p>Controls WAL file recycling - keeps at least min_wal_size, cleans up to max_wal_size.</p>

<div class="language-conf highlighter-rouge"><div class="highlight"><pre class="highlight"><code><span class="n">min_wal_size</span> = <span class="m">80</span><span class="n">MB</span>
<span class="n">max_wal_size</span> = <span class="m">1</span><span class="n">GB</span>
</code></pre></div></div>

<p>Increase max_wal_size if you have heavy write workloads or use replication.</p>

<hr />

<h2 id="parallel-query-workers">Parallel Query Workers</h2>

<h3 id="max_worker_processes">max_worker_processes</h3>
<p>Maximum background worker processes (including autovacuum).</p>

<div class="language-conf highlighter-rouge"><div class="highlight"><pre class="highlight"><code><span class="n">max_worker_processes</span> = <span class="m">8</span>
</code></pre></div></div>

<p>Should match CPU cores. Affects parallel queries and background tasks.</p>

<h3 id="max_parallel_workers_per_gather">max_parallel_workers_per_gather</h3>
<p>Maximum parallel workers per parallel table scan or join.</p>

<div class="language-conf highlighter-rouge"><div class="highlight"><pre class="highlight"><code><span class="n">max_parallel_workers_per_gather</span> = <span class="m">2</span>
</code></pre></div></div>

<h3 id="max_parallel_workers">max_parallel_workers</h3>
<p>Total parallel workers available across all parallel queries.</p>

<div class="language-conf highlighter-rouge"><div class="highlight"><pre class="highlight"><code><span class="n">max_parallel_workers</span> = <span class="m">8</span>
</code></pre></div></div>

<h3 id="max_parallel_maintenance_workers">max_parallel_maintenance_workers</h3>
<p>Parallel workers for maintenance operations (CREATE INDEX).</p>

<div class="language-conf highlighter-rouge"><div class="highlight"><pre class="highlight"><code><span class="n">max_parallel_maintenance_workers</span> = <span class="m">2</span>
</code></pre></div></div>

<hr />

<h2 id="viewing-current-settings">Viewing Current Settings</h2>

<div class="language-sql highlighter-rouge"><div class="highlight"><pre class="highlight"><code><span class="c1">-- Show all settings</span>
<span class="k">SHOW</span> <span class="k">ALL</span><span class="p">;</span>

<span class="c1">-- Show specific setting</span>
<span class="k">SHOW</span> <span class="n">shared_buffers</span><span class="p">;</span>

<span class="c1">-- Query with details</span>
<span class="k">SELECT</span> <span class="n">name</span><span class="p">,</span> <span class="n">setting</span><span class="p">,</span> <span class="n">unit</span><span class="p">,</span> <span class="n">context</span> 
<span class="k">FROM</span> <span class="n">pg_settings</span> 
<span class="k">WHERE</span> <span class="n">name</span> <span class="k">IN</span> <span class="p">(</span><span class="s1">'shared_buffers'</span><span class="p">,</span> <span class="s1">'max_connections'</span><span class="p">,</span> <span class="s1">'work_mem'</span><span class="p">);</span>
</code></pre></div></div>

<hr />

<h2 id="reloading-configuration">Reloading Configuration</h2>

<p>After modifying <code class="language-plaintext highlighter-rouge">postgresql.conf</code>, reload or restart:</p>

<div class="language-bash highlighter-rouge"><div class="highlight"><pre class="highlight"><code><span class="nt">--</span> Reload <span class="o">(</span>keeps connections<span class="o">)</span>
pg_ctl reload <span class="nt">-D</span> /path/to/data

<span class="nt">--</span> Or from psql <span class="o">(</span>doesn<span class="s1">'t require superuser)
SELECT pg_reload_conf();

-- Full restart for memory changes
pg_ctl restart -D /path/to/data
</span></code></pre></div></div>

<hr />

<h2 id="quick-tuning-recommendations">Quick Tuning Recommendations</h2>

<table>
  <thead>
    <tr>
      <th>Setting</th>
      <th>Recommended Starting Value</th>
    </tr>
  </thead>
  <tbody>
    <tr>
      <td>shared_buffers</td>
      <td>25% of RAM</td>
    </tr>
    <tr>
      <td>effective_cache_size</td>
      <td>75% of RAM</td>
    </tr>
    <tr>
      <td>work_mem</td>
      <td>4-64MB</td>
    </tr>
    <tr>
      <td>maintenance_work_mem</td>
      <td>256MB</td>
    </tr>
    <tr>
      <td>max_connections</td>
      <td>100</td>
    </tr>
    <tr>
      <td>max_worker_processes</td>
      <td>CPU cores</td>
    </tr>
  </tbody>
</table>

<p>Remember to test changes in a staging environment before applying to production!</p>

<h2 id="postgres-databases">Postgres Databases</h2>

<p>Postgres consist of multiple databases, collectively known as database cluster. Upon executing <code class="language-plaintext highlighter-rouge">initdb</code>, three databases are created: <code class="language-plaintext highlighter-rouge">template0</code>, <code class="language-plaintext highlighter-rouge">template1</code>, and <code class="language-plaintext highlighter-rouge">postgres</code>. <code class="language-plaintext highlighter-rouge">template0</code> and <code class="language-plaintext highlighter-rouge">template1</code> serve as template databases for creating user databases.</p>

<p><code class="language-plaintext highlighter-rouge">template0</code> is provided as an initial state template, while <code class="language-plaintext highlighter-rouge">template1</code> allows users to add custom templates. This facilitates user-specific customizations right from database creation. By default, the postgres database is the primary database created using the <code class="language-plaintext highlighter-rouge">template1</code> database. If no specific database is mentioned upon connection, it defaults to the postgres database. User databases are also generated by cloning the <code class="language-plaintext highlighter-rouge">template1</code> database.</p>

<div class="language-plaintext highlighter-rouge"><div class="highlight"><pre class="highlight"><code>postgres=# \c template1
You are now connected to database "template1" as user "postgres".
template1=# \dt
Did not find any tables.

template1=# create table t1 (c1 int);
CREATE TABLE
template1=# \dt
          List of tables
 Schema | Name | Type  |  Owner
--------+------+-------+----------
 public | t1   | table | postgres
(1 row)

template1=# create database db01;
CREATE DATABASE
template1=# \c db01
You are now connected to database "db01" as user "postgres".
db01=# \dt
          List of tables
 Schema | Name | Type  |  Owner
--------+------+-------+----------
 public | t1   | table | postgres
(1 row)
</code></pre></div></div>

<h2 id="tables--files-in-postgres">Tables &amp; files in Postgres</h2>

<p>Every table in the postgres database is associated with these files</p>
<ul>
  <li>Table OID file used for storing table data.</li>
  <li><code class="language-plaintext highlighter-rouge">OID_fsm</code> for managing the table’s free space</li>
  <li><code class="language-plaintext highlighter-rouge">OID_vm</code>  for managing the visibility of table blocks
Indexes created on a table lack a vm file, thus consisting of only two files <code class="language-plaintext highlighter-rouge">OID</code> and <code class="language-plaintext highlighter-rouge">OID_fsm</code></li>
</ul>

<div class="language-plaintext highlighter-rouge"><div class="highlight"><pre class="highlight"><code>~/docker-build/n8n/postgres/base/16408 » ls                                                                                  amol.di@MMMDVAMOLDI
112              175              2610_vm          2666             2831             3394_vm          3602_vm          4166
113              2187             2611             2667             2832             3395             3603             4167
1247             2224             2612             2668             2833             3429             3603_fsm         4168
1247_fsm         2228             2612_fsm         2669             2834             3430             3603_vm          4169
1247_vm          2328             2612_vm          2670             2835             3431             3604             4170
</code></pre></div></div>

<h2 id="postgres-tablespace">Postgres Tablespace</h2>

<p>Tablespaces in PostgreSQL allow database administrators to define locations in the file system where the files representing database objects can be stored.</p>

<p><code class="language-plaintext highlighter-rouge">initdb</code> also creates two tablespaces <code class="language-plaintext highlighter-rouge">pg_default</code> and <code class="language-plaintext highlighter-rouge">pg_global</code>. If a tablespace is not specified when creating a table, it is stored in the <code class="language-plaintext highlighter-rouge">pg_default</code> tablespace. Tables managed at the database cluster level are stored in the <code class="language-plaintext highlighter-rouge">pg_global</code> tablespace.</p>

<div class="language-plaintext highlighter-rouge"><div class="highlight"><pre class="highlight"><code>postgres=# select oid, * from pg_tablespace;
 oid  | oid  |  spcname   | spcowner | spcacl | spcoptions
------+------+------------+----------+--------+------------
 1663 | 1663 | pg_default |       10 |        |
 1664 | 1664 | pg_global  |       10 |        |
</code></pre></div></div>

<p>The postgres base directory stores the databases managed by default tablespace.</p>

<div class="language-plaintext highlighter-rouge"><div class="highlight"><pre class="highlight"><code>~/docker-build/n8n/postgres/base » ls                                                                                        amol.di@MMMDVAMOLDI
1     16384 16408 4     5
</code></pre></div></div>

<p>A single tablespace can be utilized by multiple databases. Within the tablespace directory, subdirectories are created for each database, named after the database’s OID.</p>

<div class="language-plaintext highlighter-rouge"><div class="highlight"><pre class="highlight"><code>postgres=# select oid, datname from pg_database order by 1;
  oid  |  datname
-------+-----------
     1 | template1
     4 | template0
     5 | postgres
 16384 | n8n
 16408 | db01
</code></pre></div></div>

<p>Benifits of tablespace:</p>
<ul>
  <li>
    <p>First, if the partition or volume on which the cluster was initialized runs out of space and cannot be extended, a tablespace can be created on a different partition and used until the system can be reconfigured.</p>
  </li>
  <li>
    <p>Second, tablespaces allow an administrator to use knowledge of the usage pattern of database objects to optimize performance. For example, an index which is very heavily used can be placed on a very fast, highly available disk, such as an expensive solid state device. At the same time a table storing archived data which is rarely used or not performance critical could be stored on a less expensive, slower disk system.</p>
  </li>
</ul>

<h3 id="simple-example-of-using-postgres-to-move-table-index-to-a-fastdisk">Simple example of using postgres to move table index to a fastdisk</h3>

<p>Tables and indexes are stored independently in PostgreSQL. We can have table data on default tablespace (pg_default) &amp; index in a new tablespace (fast_disk)</p>

<p>Current situation:</p>
<div class="language-plaintext highlighter-rouge"><div class="highlight"><pre class="highlight"><code>pg_default
   orders
   orders_customer_id_idx
</code></pre></div></div>

<p>First create a tablespace on the new disk:</p>

<p><code class="language-plaintext highlighter-rouge">CREATE TABLESPACE index_space LOCATION '/mnt/fast_disk';</code></p>

<p>Then move the index:</p>

<p><code class="language-plaintext highlighter-rouge">ALTER INDEX large_table_idx SET TABLESPACE index_space;</code></p>

<p>After move:</p>
<div class="language-plaintext highlighter-rouge"><div class="highlight"><pre class="highlight"><code>pg_default
   orders

index_space
   orders_customer_id_idx
</code></pre></div></div>

<p>Table remains in original tablespace. Only the index moves, not the table.</p>]]></content><author><name></name></author><category term="PostgreSQL" /><category term="Database" /><category term="postgres" /><category term="configuration" /><category term="performance" /><category term="tablespace" /><summary type="html"><![CDATA[This is a continuation of my effort to explore and understand Postgres. In this post I will be covering important configuration and its database structure.]]></summary></entry><entry><title type="html">Postgres Fundamentals - The Concept</title><link href="https://amoldighe.github.io/2026/03/06/postgres-fundamentals/" rel="alternate" type="text/html" title="Postgres Fundamentals - The Concept" /><published>2026-03-06T00:00:00+00:00</published><updated>2026-03-06T00:00:00+00:00</updated><id>https://amoldighe.github.io/2026/03/06/postgres-fundamentals</id><content type="html" xml:base="https://amoldighe.github.io/2026/03/06/postgres-fundamentals/"><![CDATA[<p>Having relied on PostgreSQL within a Patroni cluster to power our production Airflow environment for some time, I’ve recently begun exploring the database more deeply. I am consistently impressed by its robust feature set and its widespread reputation across the industry as a truly reliable, enterprise-grade database solution. This fascination inspired me to pull back the curtain and understand exactly “what is under the hood” and how PostgreSQL actually works. This blog post is the result of that journey, focusing on the essential fundamentals of PostgreSQL architecture and operation.</p>

<h2 id="introduction">Introduction</h2>
<p>Postgres is a relational database management system (RDBMS). It stores structural data &amp; allows manipulation using SQL. Apart from being a data store it is a transactional, concurrent, extensible data engine built to adhere to ACID properties at scale.</p>
<ul>
  <li>Atomicity - All or nothing</li>
  <li>Consistency - A transaction must bring the database from one valid state to another.</li>
  <li>Isolation - Concurrent transactions are isolated from each other.</li>
  <li>Durability - Data is persistent even in case of system failure.</li>
</ul>

<p>Unlike standard relational databases, Postgres allows for custom data types, inheritance, and complex structures like JSONB and geometric objects and also allows attaching methods, operators to them.</p>

<p>Postgres Architecture is built around a concept of background processes and shared memory.</p>

<p><img src="/img/postgres-architecture.png" /></p>

<h2 id="background-processes">
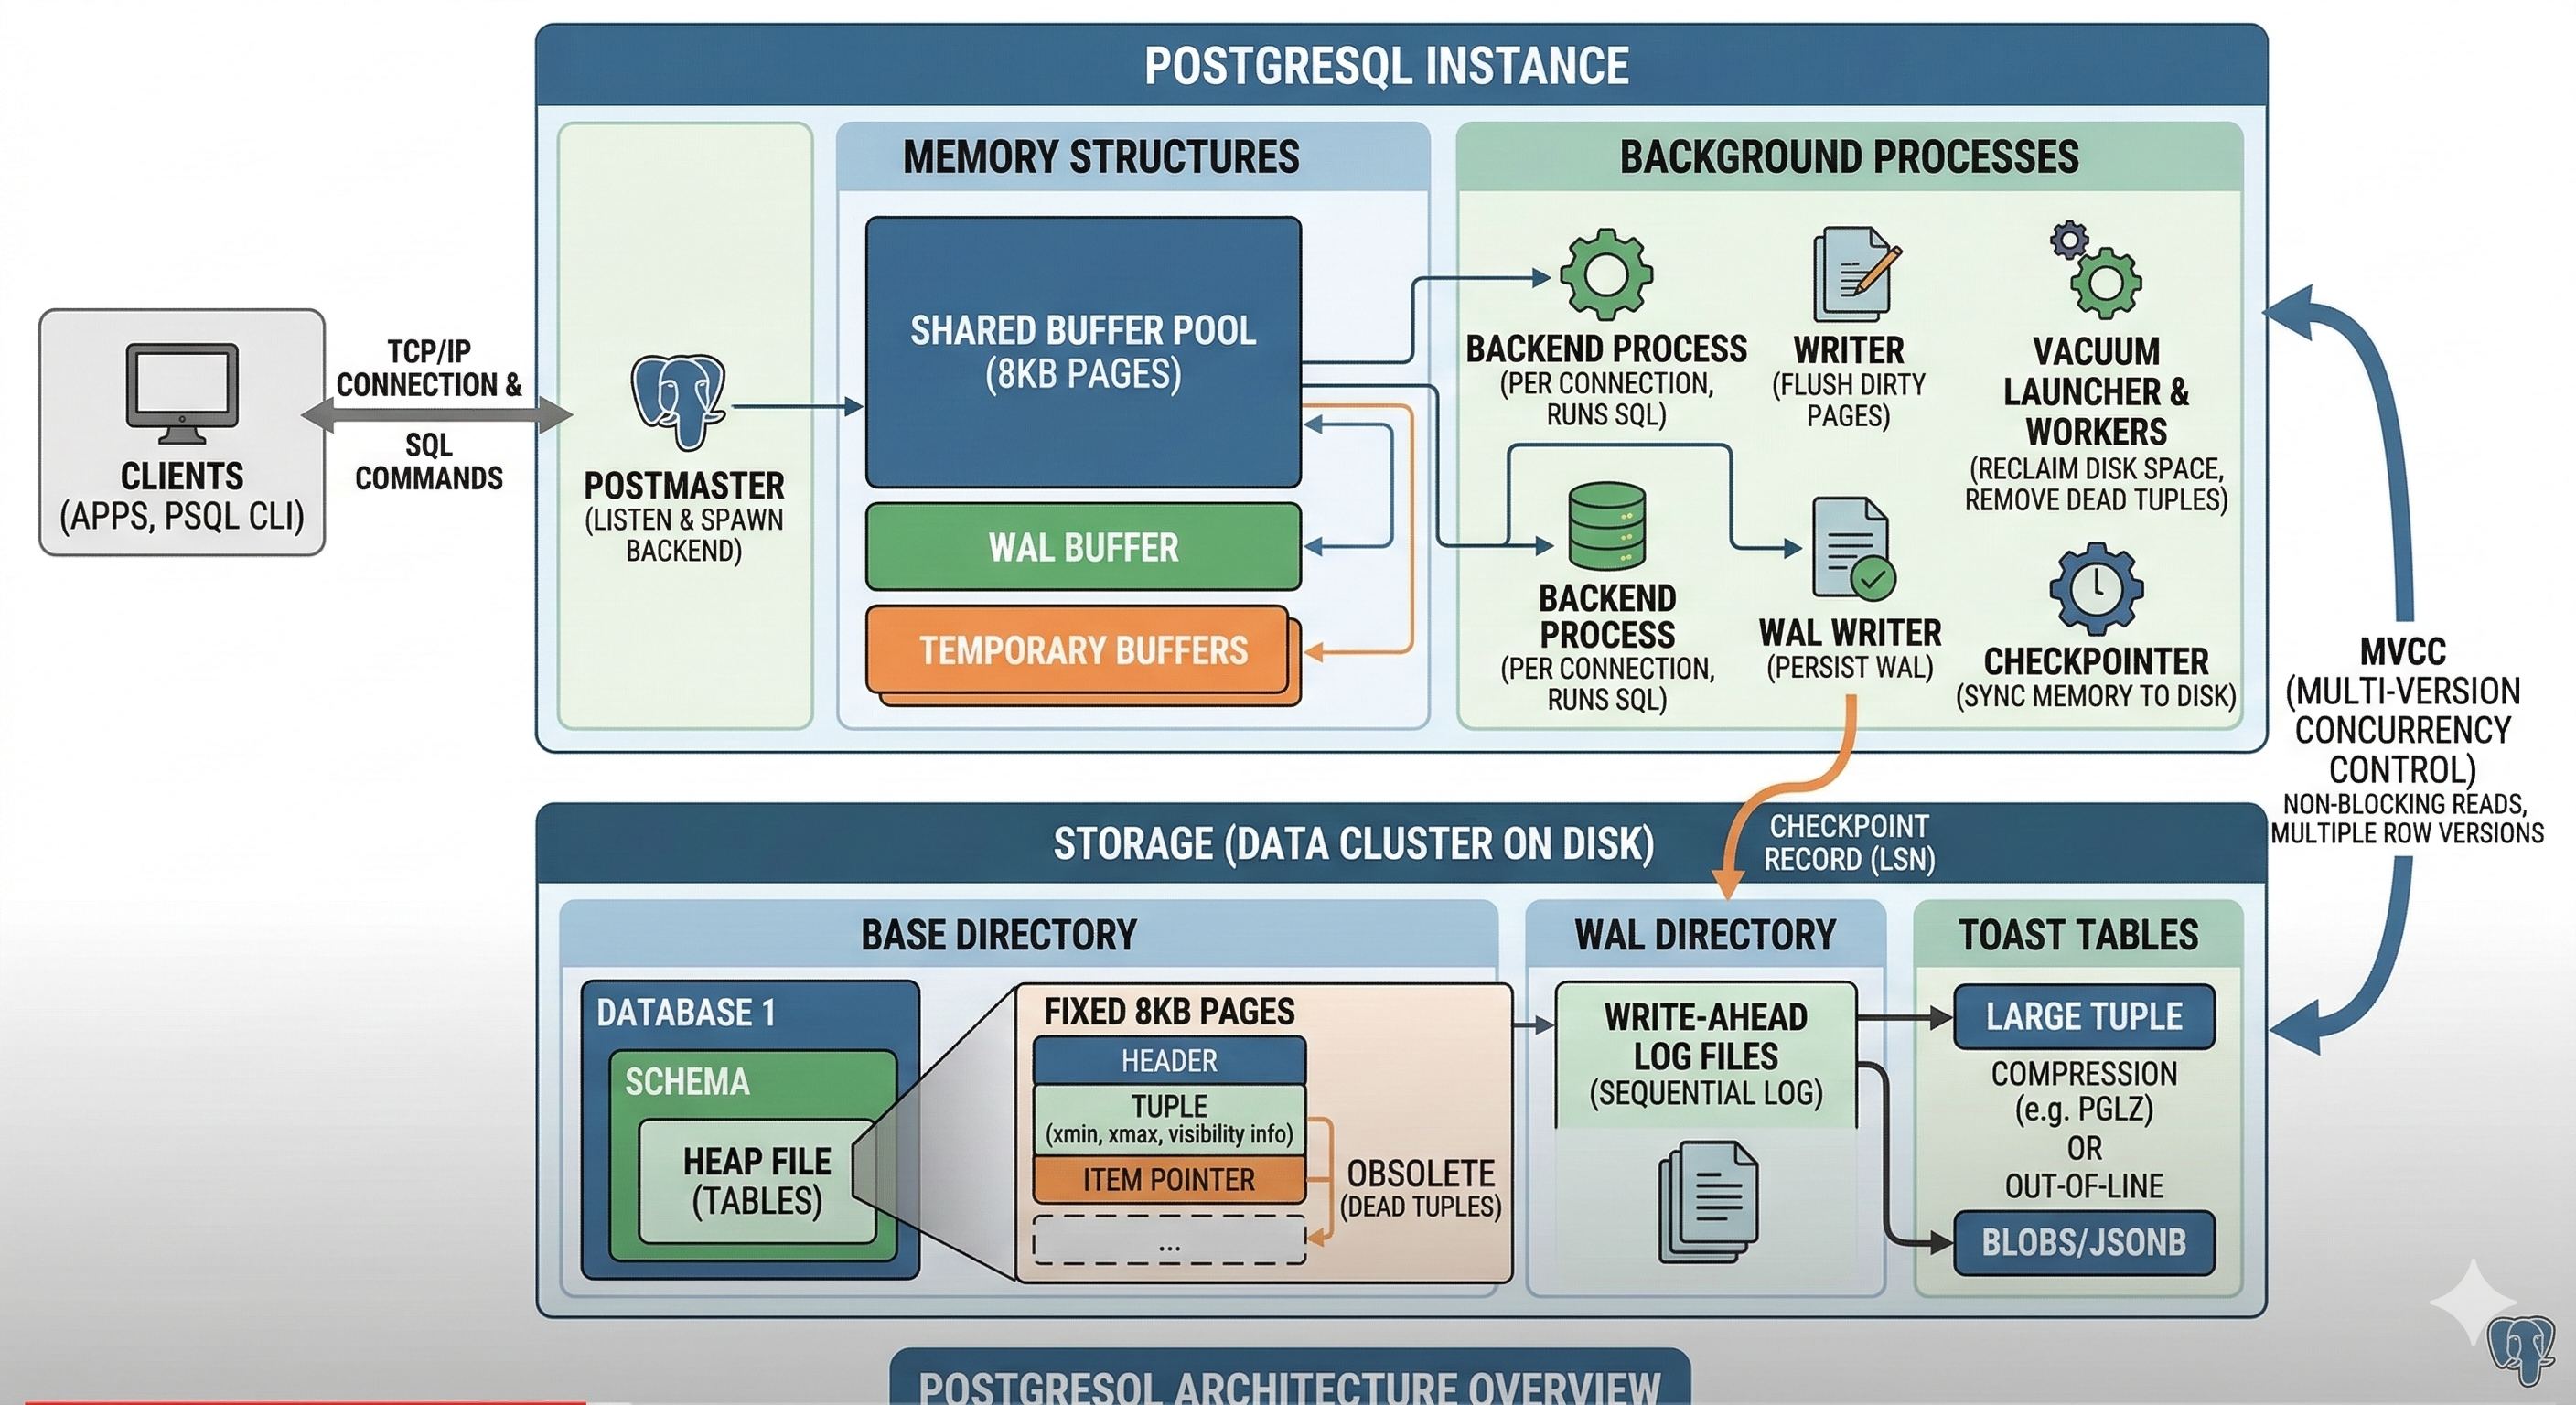
Background Processes</h2>
<p>These are the essential ‘housekeeping’ processes that keep the system running. The diagram shows the Postmaster handling incoming client connections and spawning individual Backend Processes.</p>

<div class="language-plaintext highlighter-rouge"><div class="highlight"><pre class="highlight"><code>207 pts/0 S+ 0:00 \_ /usr/lib/postgresql/18/bin/psql -U postgres -d n8n
1 ? Ss 0:17 postgres
28 ? Ss 0:00 postgres: io worker 0
29 ? Ss 0:00 postgres: io worker 2
30 ? Ss 0:00 postgres: io worker 1
31 ? Ss 0:01 postgres: checkpointer
32 ? Ss 0:02 postgres: background writer
34 ? Ss 0:02 postgres: walwriter
35 ? Ss 0:06 postgres: autovacuum launcher
36 ? Ss 0:00 postgres: logical replication launcher
238 ? Ss 0:00 postgres: postgres postgres [local] idle

</code></pre></div></div>

<table>
  <thead>
    <tr>
      <th>Process</th>
      <th>Action Performed</th>
    </tr>
  </thead>
  <tbody>
    <tr>
      <td><strong>Postmaster</strong></td>
      <td>Listens for new connection requests and spawns a dedicated backend process for each client.</td>
    </tr>
    <tr>
      <td><strong>Backend Process</strong></td>
      <td>Executes SQL queries, manages transactions, and retrieves or modifies data for a specific connected user.</td>
    </tr>
    <tr>
      <td><strong>Background Writer</strong></td>
      <td>Periodically flushes “dirty” data pages from the shared buffer cache to persistent disk storage.</td>
    </tr>
    <tr>
      <td><strong>Checkpointer</strong></td>
      <td>Creates synchronization points by forcing all modified memory buffers to disk and updating the WAL control file.</td>
    </tr>
    <tr>
      <td><strong>WAL Writer</strong></td>
      <td>Continuously writes transaction log data from memory buffers to sequential Write-Ahead Log files on disk.</td>
    </tr>
    <tr>
      <td><strong>Autovacuum Launcher</strong></td>
      <td>Monitors table bloat and schedules worker processes to reclaim space from dead tuples.</td>
    </tr>
    <tr>
      <td><strong>Autovacuum Worker</strong></td>
      <td>Performs the actual cleanup of deleted/updated rows and updates table statistics for the query planner.</td>
    </tr>
    <tr>
      <td><strong>Stats Collector</strong></td>
      <td>Aggregates and records runtime information about table access, index usage, and row counts.</td>
    </tr>
    <tr>
      <td><strong>Archiver</strong></td>
      <td>Copies completed WAL segment files to a secure backup storage location for point-in-time recovery.</td>
    </tr>
    <tr>
      <td><strong>Logger</strong></td>
      <td>Captures system error messages and performance events and writes them to the database log files.</td>
    </tr>
  </tbody>
</table>

<h2 id="shared-memory">Shared memory</h2>
<p>Shared memory is the critical communication highway in PostgreSQL, allowing various background processes to access and update data without constant disk I/O.</p>

<p><strong>Shared Buffer Pool</strong>
Acts as the primary data cache; it loads 8KB pages from disk into memory so that multiple backend processes can read and modify the same data quickly without hitting the slow physical storage.</p>

<p><strong>WAL Buffer</strong>
A temporary staging area for Write-Ahead Log (WAL) records; it holds transaction logs in memory until they are flushed to disk by the WAL Writer, ensuring durability without stalling the transaction for every single write.</p>

<p><strong>Commit Log (CLOG)</strong>
A specialized memory area that tracks the status of every transaction (whether it is in progress, committed, or aborted), allowing processes to quickly determine if a row version (tuple) is visible based on its transaction ID.</p>

<p><strong>Lock Manager</strong>
Maintains a shared table of all database locks (row-level, table-level, etc.); it coordinates access between concurrent transactions to prevent them from conflicting or corrupting data during updates.</p>

<p><strong>ProcArray</strong>
Stores the status and metadata of all currently active backend processes; it is primarily used to generate “snapshots” for MVCC, helping the system decide which data versions are visible to which users at any given moment.</p>

<h2 id="storage">Storage</h2>
<p>Postgres seperates logics of how querries are executed and storage i.e. how data is stored on disk.</p>

<p>On disk, PostgreSQL organizes data into a specific hierarchy designed for reliability and fast retrieval. Here is a breakdown of the primary storage structures:</p>

<p><strong>Data Files (Heap Files)</strong>
The primary storage for tables, where data is organized into 8KB pages. Rows are represented internally as “tuples,” which contain both the raw data and metadata (like transaction IDs) used for concurrency control. Instead of overwriting rows, Postgres appends new versions of rows (tuples) to these files, which is the physical foundation for MVCC.</p>

<p><strong>Index Files</strong>
Separate files (usually B-Trees) that store pointers to the physical locations of rows in the heap files. They allow the database to find specific data without scanning every single page in a table.</p>

<p><strong>Write-Ahead Log (WAL)</strong>
A sequential “journal” of every change made to the database. Before a change is applied to the main data files, it is recorded here first; this ensures that if the system crashes, the database can “replay” the log to restore its state.</p>

<p><strong>TOAST Tables</strong>
The Oversized Attribute Storage Technique. When a single row value (like a large JSON blob or long text) exceeds the 8KB page limit, Postgres automatically moves that specific value into a separate “TOAST” file to keep the main table lean and performant. A pointer to the TOAST file is stored in the main table.</p>

<p><strong>Commit Log (CLOG)</strong>
A set of files in the pg_xact directory that stores the final status of every transaction (Commited, Aborted, or In-Progress). This is the “source of truth” used to determine which row versions are visible to users.</p>

<p><strong>Free Space Map (FSM)</strong>
A binary file that tracks how much empty space is available in each 8KB page of a table. When a new row is inserted, Postgres consults the FSM to quickly find a page with enough room, rather than searching the whole table.</p>

<p><strong>Visibility Map (VM)</strong>
A simple map that tracks which pages in a table contain only “frozen” (all-visible) rows. This allows the Autovacuum process to skip those pages and helps speed up “Index-Only” scans.</p>

<p><strong>MVCC &amp; WAL</strong> are two important concepts in Postgres that enable high concurrency and data durability.</p>

<p><img src="/img/postgres-mvcc.png" /></p>

<h2 id="mvcc-multi-version-concurrency-control">
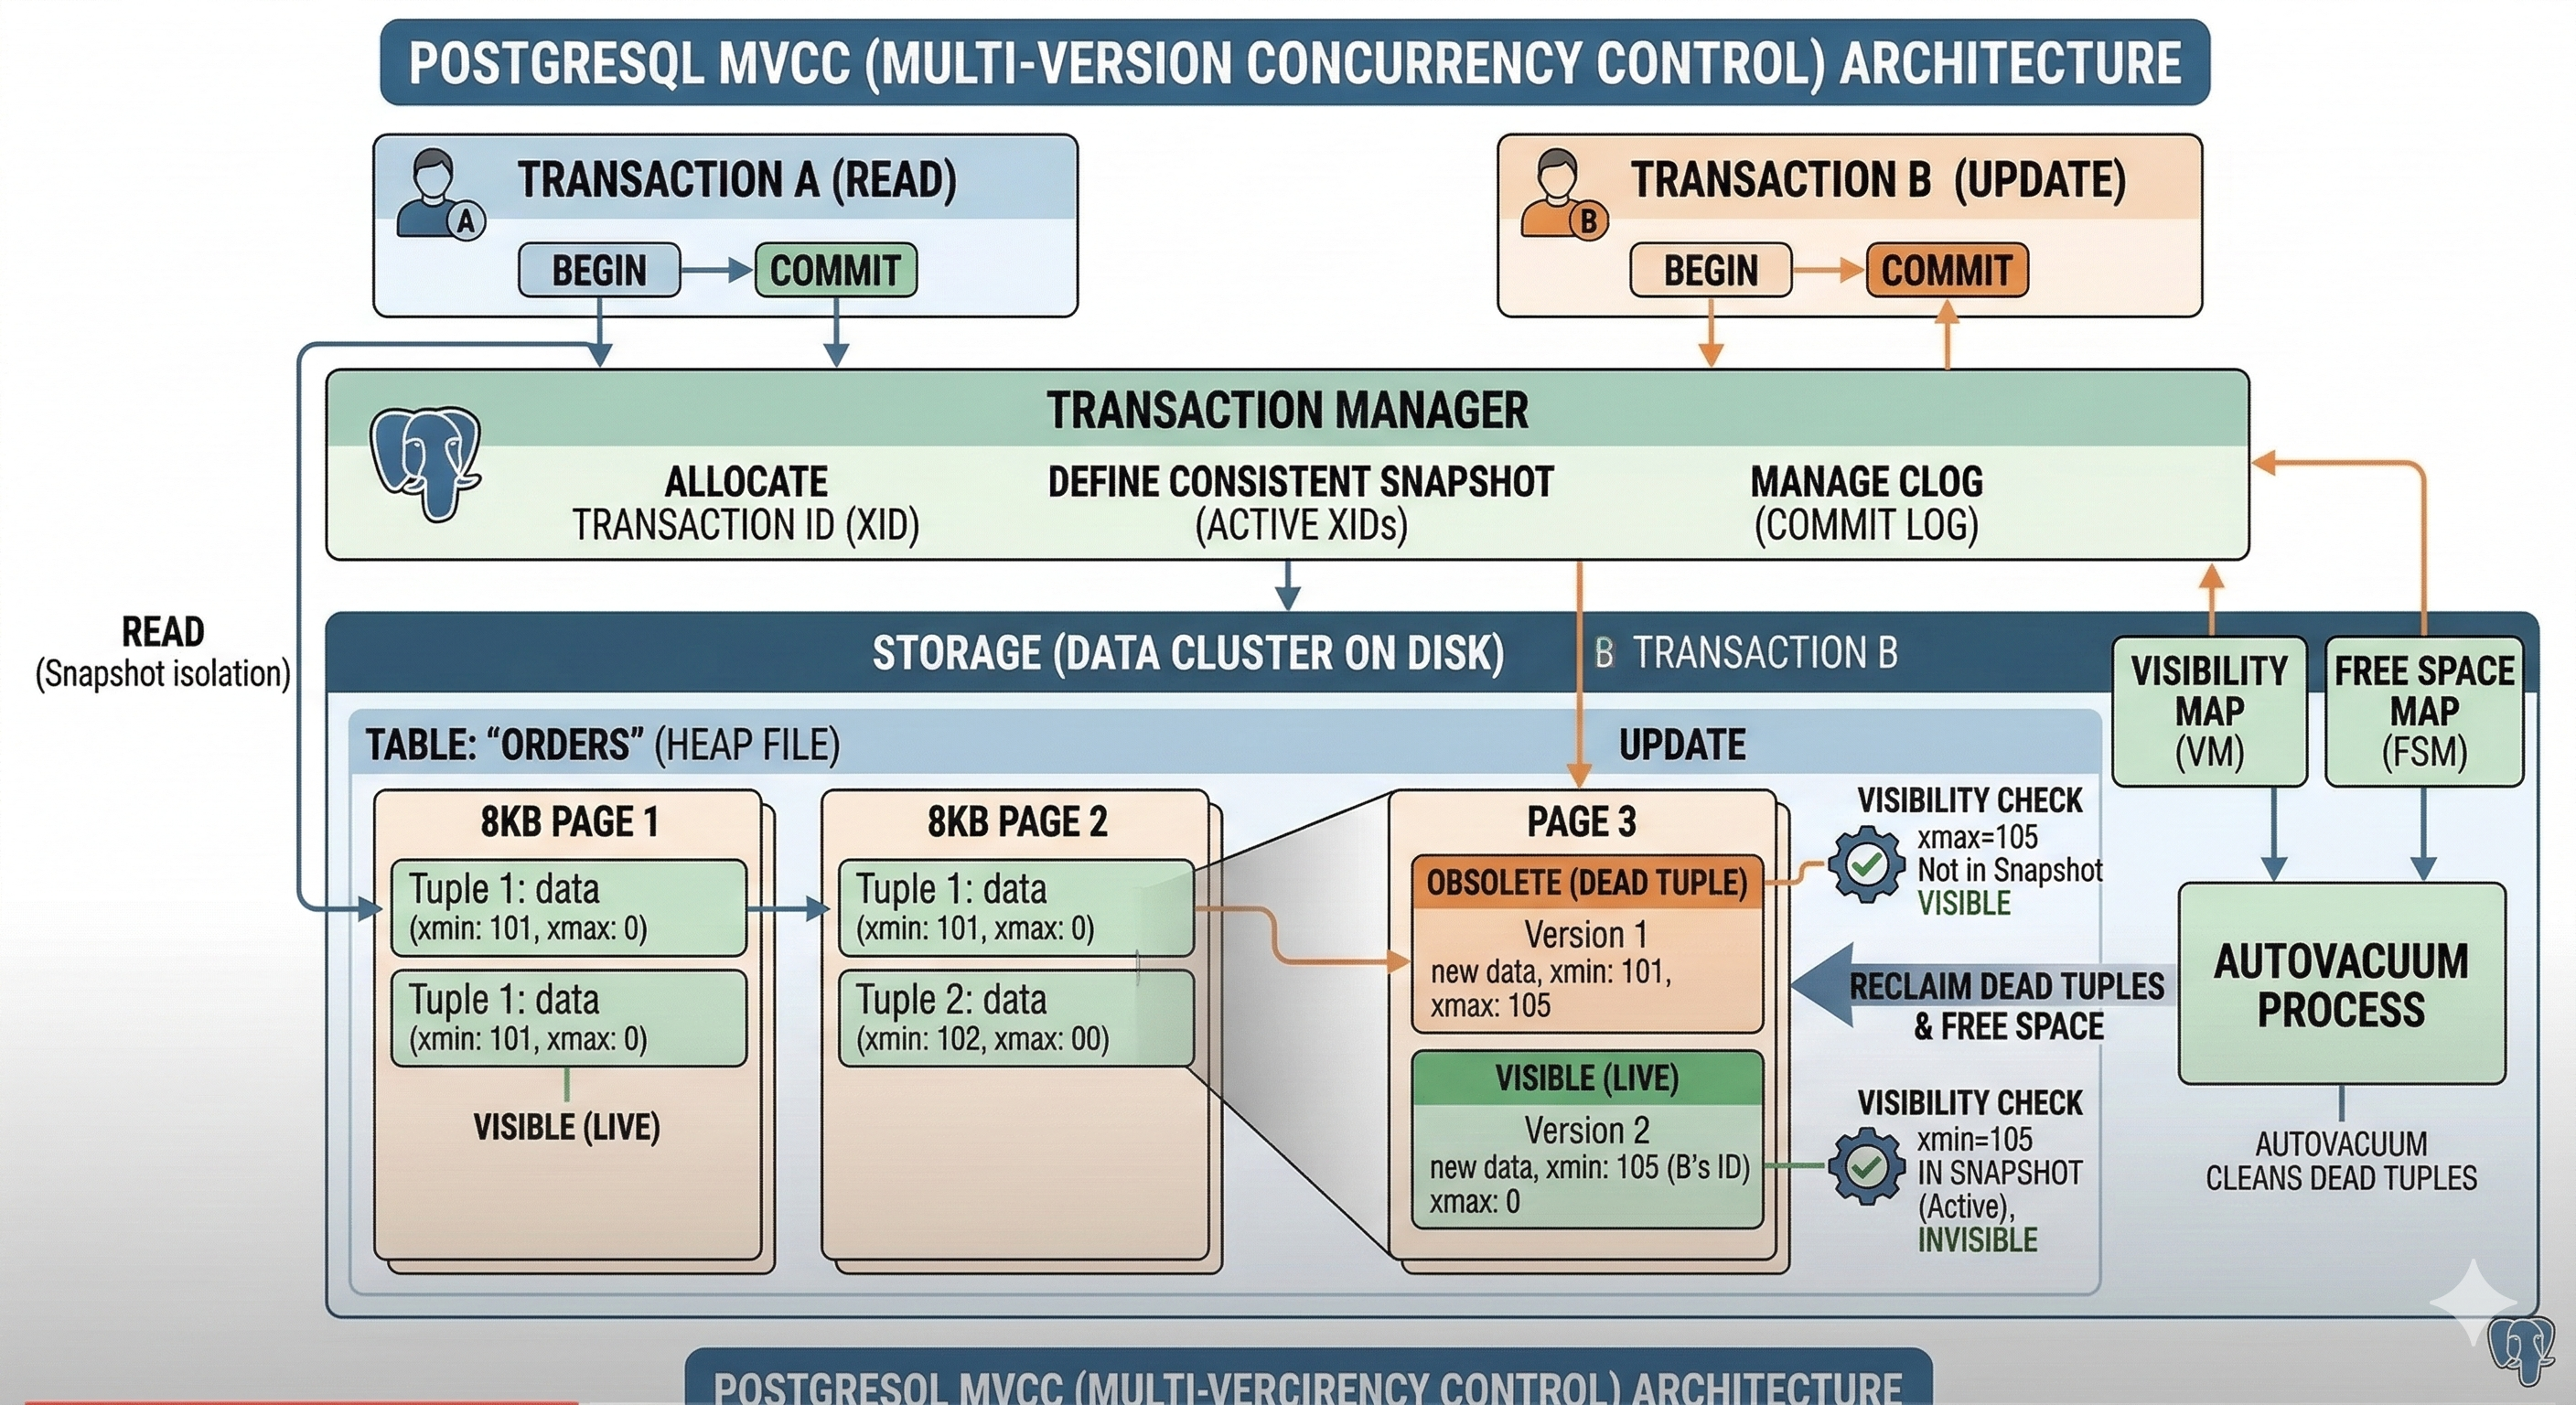
MVCC (Multi-Version Concurrency Control)</h2>
<p>MVCC is the engine that allows multiple users to read and write to the same table simultaneously without locking each other out. The core philosophy is: “Readers never block writers, and writers never block readers.” Here is how it works at the transaction level:</p>

<p><strong>The “No Overwrite” Rule</strong></p>

<p>Unlike other databases that might update a row in place, Postgres never overwrites existing data.</p>
<ul>
  <li>When you UPDATE a row, Postgres marks the old version as “obsolete” and inserts a completely new version (a new tuple) into the table.</li>
  <li>When you DELETE a row, it simply marks the    row as “deleted” but leaves it on the disk for a while.</li>
</ul>

<p><strong>Transaction IDs (xmin and xmax)</strong></p>

<p>Every row (tuple) on the disk has two hidden “bookkeeping” columns that manage visibility:</p>
<ul>
  <li>xmin: The ID of the transaction that created (inserted) the row.</li>
  <li>xmax: The ID of the transaction that deleted or updated the row. If the row hasn’t been deleted, xmax is 0.</li>
</ul>

<p><strong>Snapshot Isolation</strong></p>
<ul>
  <li>When you start a transaction, Postgres gives you a Snapshot. This is a list of all transactions that are currently active or committed.</li>
  <li>The Logic: Your transaction can only “see” rows where the xmin is a transaction that was already committed before your snapshot was taken.</li>
  <li>The Result: If User A is updating a row but hasn’t clicked “Commit” yet, User B can still read the old version of that row. User B is essentially looking at a “version” of the database from a point in the past.</li>
</ul>

<p><strong>Row Visibility Flow</strong></p>

<p>To determine if a row is visible to your current transaction, Postgres follows these basic rules:</p>
<ul>
  <li>Is xmin committed? If no, the row is invisible (it’s from a future or failed transaction).</li>
  <li>Is xmax zero or uncommitted? If yes, the row is still valid and visible.</li>
  <li>Is xmax committed? If yes, the row is “dead” (deleted) and invisible to you, because a transaction finished deleting it before you looked.</li>
</ul>

<p><strong>The Cleanup (Vacuum)</strong></p>

<p>Because every update creates a new version, the database would eventually run out of disk space. This “clutter” is called Bloat. The Autovacuum process periodically scans the table. It looks for rows where the xmax is so old that no active transaction could possibly need to see it anymore. It then clears those rows so the space can be reused for new data.</p>

<p><img src="/img/postgres-wal.png" /></p>

<h2 id="wal-write-ahead-logging">WAL (Write-Ahead Logging)</h2>
<p>
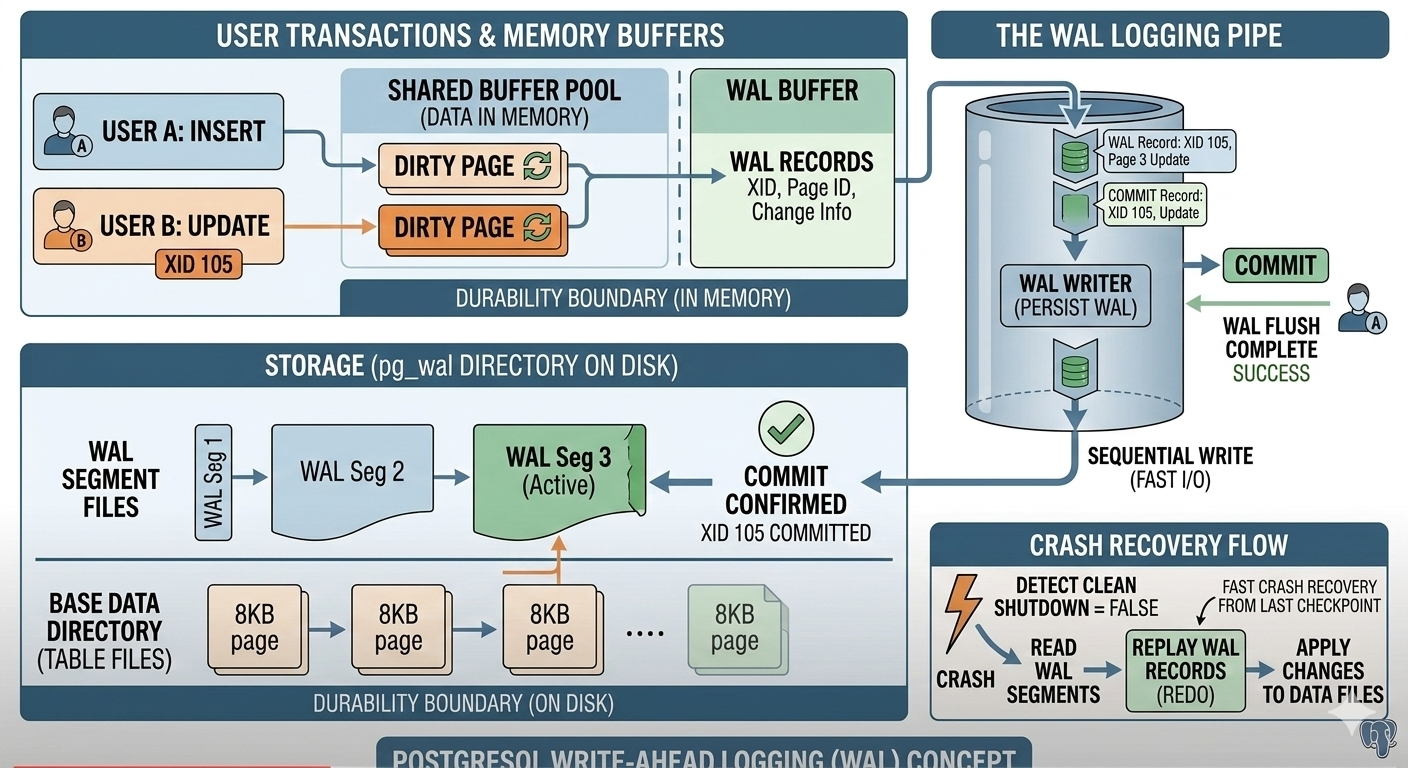
WAL is the fundamental mechanism that guarantees database durability (the ‘D’ in ACID). Its core philosophy can be summarized in one rule: “No change to data files is ever made until a description of that change has been written to the log and flushed to permanent storage.” Here is a conceptual breakdown of how WAL works:</p>

<p><strong>The Problem: Memory vs. Disk Speed</strong></p>

<p>To make databases fast, PostgreSQL does most of its work (reading, inserting, updating data) in memory (the Shared Buffer Pool). Writing data sequentially to a log file on disk is much faster than jumping around randomly updating massive data files. If the database crashed while changes were only in memory, those changes would be lost. WAL solves this.</p>

<p><strong>The Solution: Log It First</strong></p>

<p>When a transaction performs an action (e.g., UPDATE users SET age = 30 WHERE id = 1):</p>
<ul>
  <li>PostgreSQL first modifies the data in memory (creating a “dirty page”).</li>
  <li>Before the change is written to the main data files, a description of the change (a “WAL record”) is constructed.</li>
  <li>This WAL record is written sequentially into the WAL Buffer in memory.</li>
</ul>

<p><strong>The WAL Writer and Durability</strong></p>

<p>The key moment for durability happens during a COMMIT:</p>
<ul>
  <li>When the application issues a COMMIT command, the transaction cannot be considered “complete” until its corresponding WAL records are safely on disk.</li>
  <li>The dedicated WAL Writer process is responsible for flushing WAL records from the memory buffer into sequential WAL segments on physical storage.</li>
  <li>Only after the WAL flush is successful does PostgreSQL report “COMMIT Complete” back to the application.</li>
</ul>

<p><strong>What Happens During a Crash?</strong></p>

<ul>
  <li>If power is lost or the OS crashes:</li>
  <li>Upon restart, PostgreSQL detects it didn’t shut down cleanly.</li>
  <li>It looks at the main data files, which might be “inconsistent” (some changes might have made it to disk, others might have been lost from memory).</li>
  <li>It finds the last known safe point (the last Checkpoint) in the WAL.</li>
  <li>It begins Replay (Redo): It reads the WAL segments sequentially from that checkpoint forward.</li>
  <li>It re-applies every single change described in the WAL to the main data files, bringing them to a consistent, committed state.</li>
</ul>

<p>By using WAL, PostgreSQL achieves a balance:</p>
<ul>
  <li>Safety: The sequential WAL write ensures durability.</li>
  <li>Performance: The actual data files can be updated lazily in the background by other processes (the Background Writer), allowing user transactions to finish quickly without waiting for random disk I/O.</li>
</ul>]]></content><author><name></name></author><category term="Postgres" /><category term="Database" /><category term="RDBMS" /><category term="ACID" /><category term="Transaction" /><category term="Isolation" /><category term="Durability" /><category term="MVCC" /><category term="WAL" /><summary type="html"><![CDATA[Having relied on PostgreSQL within a Patroni cluster to power our production Airflow environment for some time, I’ve recently begun exploring the database more deeply. I am consistently impressed by its robust feature set and its widespread reputation across the industry as a truly reliable, enterprise-grade database solution. This fascination inspired me to pull back the curtain and understand exactly “what is under the hood” and how PostgreSQL actually works. This blog post is the result of that journey, focusing on the essential fundamentals of PostgreSQL architecture and operation.]]></summary></entry><entry><title type="html">Opensource AI Fundamentals</title><link href="https://amoldighe.github.io/2026/02/24/opensource-ai-stack/" rel="alternate" type="text/html" title="Opensource AI Fundamentals" /><published>2026-02-24T00:00:00+00:00</published><updated>2026-02-24T00:00:00+00:00</updated><id>https://amoldighe.github.io/2026/02/24/opensource-ai-stack</id><content type="html" xml:base="https://amoldighe.github.io/2026/02/24/opensource-ai-stack/"><![CDATA[<h2 id="what-is-opensource-ai">What is Opensource AI?</h2>

<p>A collection of technology &amp; frameworks that is needed to use opensource AI to build systems &amp; applications.
e.g. build AI agent to book a flight OR shop for the right shoes at the right price point by comparing across multiple shopping websites.</p>

<hr />

<h2 id="-ai-models---proprietary-vs-opensource-models">* AI Models - Proprietary vs Opensource Models</h2>

<p>Choosing the right model is the foundation of any AI system. There are two categories:</p>

<p><strong>Proprietary Models</strong> — Closed-source, API-access only, typically more capable out-of-the-box:</p>
<ul>
  <li><strong>OpenAI</strong> GPT-4.5, o3, o3-mini, o1</li>
  <li><strong>Anthropic</strong> Claude 3.7 Sonnet (with extended thinking), Claude 3.5 Haiku</li>
  <li><strong>Google</strong> Gemini 2.0 Flash, Gemini 2.0 Pro (Experimental)</li>
  <li><strong>xAI</strong> Grok-3, Grok-3 mini</li>
  <li><strong>Microsoft</strong> Phi-4 (via Azure AI Foundry)</li>
</ul>

<p><strong>Opensource Models</strong> — Weights available publicly, can be run locally or self-hosted:</p>
<ul>
  <li><strong>Llama 3.3</strong> (70B) from Meta — Latest flagship open model, best-in-class instruction following</li>
  <li><strong>DeepSeek-R1</strong> / <strong>DeepSeek-V3</strong> — Top-tier reasoning &amp; coding, rivals GPT-4o at 1/10th cost</li>
  <li><strong>Qwen 2.5</strong> / <strong>Qwen2.5-Coder</strong> (7B, 32B, 72B) from Alibaba — Excellent coding &amp; multilingual</li>
  <li><strong>Qwen3-VL</strong> (2B, 7B) — Multimodal (vision + language), great for image understanding tasks</li>
  <li><strong>Mistral Small 3.1</strong> (24B) — Fast, efficient, Apache 2.0 licensed, strong instruction following</li>
  <li><strong>Gemma 3</strong> (1B, 4B, 12B, 27B) from Google — Lightweight, optimized for local inference</li>
  <li><strong>Phi-4</strong> (14B) from Microsoft — Punches above its weight on reasoning benchmarks</li>
  <li><strong>GLM-4</strong> from Zhipu AI — Strong multilingual support, especially Chinese + English</li>
  <li><strong>Kimi k1.5</strong> from Moonshot AI — Long-context reasoning model (up to 128k tokens)</li>
</ul>

<hr />

<h2 id="-model-ranking-leaderboard">* Model Ranking Leaderboard</h2>

<p>Before picking a model, consult benchmarks and community rankings to find the best fit for your use case (coding, reasoning, instruction-following, multilingual, etc.):</p>

<ul>
  <li><a href="https://llm-stats.com/">llm-stats.com</a> — Aggregated benchmarks and cost comparison</li>
  <li><a href="https://openrouter.ai/rankings">OpenRouter Rankings</a> — Real-world usage and popularity rankings across providers</li>
  <li><a href="https://huggingface.co/spaces/open-llm-leaderboard/open_llm_leaderboard#/">HuggingFace Open LLM Leaderboard</a> — Standardized evals (MMLU, HellaSwag, ARC, etc.)</li>
</ul>

<p>Key benchmarks to look at:</p>
<ul>
  <li><strong>MMLU</strong> — General knowledge across 57 subjects</li>
  <li><strong>HumanEval / MBPP</strong> — Coding ability</li>
  <li><strong>MT-Bench</strong> — Multi-turn conversation quality</li>
  <li><strong>MATH / GSM8K</strong> — Mathematical reasoning</li>
</ul>

<hr />

<h2 id="-model-manager--ollama--docker-desktop-models">* Model Manager — Ollama &amp; Docker Desktop Models</h2>

<p>To run and manage open-source models locally, you need a model manager:</p>

<p><strong><a href="https://ollama.com">Ollama</a></strong></p>
<ul>
  <li>Easiest way to download, run, and switch between local LLMs</li>
  <li>
    <p>Single command to pull and run: <code class="language-plaintext highlighter-rouge">ollama run llama3</code></p>
  </li>
  <li>REST API at <code class="language-plaintext highlighter-rouge">http://localhost:11434</code> — compatible with OpenAI API format</li>
  <li>Supports: Llama 3, Mistral, Gemma, Phi, Qwen, DeepSeek, and more</li>
  <li>Cross-platform: macOS, Linux, Windows</li>
</ul>

<p><strong>Docker Desktop Models</strong></p>
<ul>
  <li>Docker Desktop (4.40+) has a built-in AI model runner</li>
  <li>Pull and run models as containers: <code class="language-plaintext highlighter-rouge">docker model run ai/llama3.2</code>
    <div class="language-plaintext highlighter-rouge"><div class="highlight"><pre class="highlight"><code>~ » docker model list                                                                                  
MODEL NAME  PARAMETERS  QUANTIZATION   ARCHITECTURE  MODEL ID      CREATED       CONTEXT  SIZE
gemma3      3.88 B      MOSTLY_Q4_K_M  gemma3        a353a8898c9d  5 months ago           2.31 GiB
</code></pre></div>    </div>
  </li>
  <li>Exposes OpenAI-compatible API endpoint locally</li>
</ul>

<div class="language-plaintext highlighter-rouge"><div class="highlight"><pre class="highlight"><code>(base)  ~/ curl http://localhost:12434/v1/models

{"object":"list","data":[{"id":"docker.io/ai/gemma3:latest","object":"model","created":1758368217,"owned_by":"docker"}]}

(base)  ~/ curl http://localhost:12434/v1/chat/completions \
  -H "Content-Type: application/json" \
  -d '{
    "model": "ai/gemma3",
    "messages": [{"role": "user", "content": "who are you"}]
  }'

{"choices":[{"finish_reason":"stop","index":0,"message":{"role":"assistant","content":"I'm Gemma, a large language model created by the Gemma team at Google DeepMind. I'm an open-weights model, which means I’m widely available for public use! \n\nI can take text and images as inputs and respond with text. \n\nIt’s nice to meet you!"}}],"created":1775723162,"model":"model.gguf","system_fingerprint":"b1-0988acc","object":"chat.completion","usage":{"completion_tokens":65,"prompt_tokens":12,"total_tokens":77,"prompt_tokens_details":{"cached_tokens":0}},"id":"chatcmpl-0urCVAwxCjdfxOEOJ0fo2uNR987Am3Em","timings":{"cache_n":0,"prompt_n":12,"prompt_ms":124.101,"prompt_per_token_ms":10.34175,"prompt_per_second":96.69543355815023,"predicted_n":65,"predicted_ms":1414.579,"predicted_per_token_ms":21.762753846153846,"predicted_per_second":45.9500671224442}}%
</code></pre></div></div>

<ul>
  <li>Useful if your stack is already containerized</li>
</ul>

<hr />

<h2 id="-running-a-local-model">* Running a Local Model</h2>

<p>Steps to get a model running locally:</p>

<ol>
  <li><strong>Install Ollama</strong>: Download from <a href="https://ollama.com">ollama.com</a> and install</li>
  <li><strong>Pull a model</strong>: <code class="language-plaintext highlighter-rouge">ollama pull qwen3-vl:2b</code> or <code class="language-plaintext highlighter-rouge">ollama pull deepseek-coder-v2:latest </code>
    <div class="language-plaintext highlighter-rouge"><div class="highlight"><pre class="highlight"><code>~ » ollama list
NAME                        ID              SIZE      MODIFIED
deepseek-coder-v2:latest    63fb193b3a9b    8.9 GB    45 hours ago
qwen3-vl:2b                 0635d9d857d4    1.9 GB    3 days ago
qwen2.5-coder:7b            dae161e27b0e    4.7 GB    12 days ago
</code></pre></div>    </div>
  </li>
  <li><strong>Run the model interactively</strong>: <code class="language-plaintext highlighter-rouge">ollama run qwen3-vl:2b</code></li>
  <li><strong>Use via API</strong>:
    <div class="language-bash highlighter-rouge"><div class="highlight"><pre class="highlight"><code>curl http://localhost:11434/api/generate <span class="se">\</span>
  <span class="nt">-d</span> <span class="s1">'{"model": "qwen3-vl:2b", "prompt": "Explain RAG in simple terms"}'</span>
</code></pre></div>    </div>
  </li>
  <li><strong>Persist context</strong> using chat API for multi-turn conversations</li>
  <li><strong>Monitor performance</strong>: Check RAM/VRAM usage — most 7B models need ~8GB RAM; 13B needs ~16GB</li>
</ol>

<p>Tips:</p>
<ul>
  <li>Use <strong>quantized models</strong> (e.g., Q4_K_M) for lower memory footprint with minimal quality loss</li>
  <li>GPU acceleration is automatic on Apple Silicon (Metal) and CUDA (NVIDIA)</li>
</ul>

<hr />

<h2 id="-building-ai-agents--no-code-ollama--n8n">* Building AI Agents — No-Code: Ollama + n8n</h2>

<p>For no-code / low-code AI agent building:</p>

<p><strong><a href="https://n8n.io">n8n</a></strong> is an open-source workflow automation tool similar to Zapier/Make, but self-hostable and AI-native.</p>

<p><strong>Architecture</strong>:</p>
<div class="language-plaintext highlighter-rouge"><div class="highlight"><pre class="highlight"><code>User Input → n8n Workflow → Ollama (local LLM) → Tool Calls → Response
</code></pre></div></div>

<p><strong>Steps</strong>:</p>
<ol>
  <li>Self-host n8n via Docker: <code class="language-plaintext highlighter-rouge">docker run -it --rm -p 5678:5678 n8nio/n8n</code></li>
  <li>Add an <strong>AI Agent node</strong> in n8n</li>
  <li>Connect it to <strong>Ollama Chat Model node</strong> (point to <code class="language-plaintext highlighter-rouge">http://localhost:11434</code>)</li>
  <li>Add <strong>Tool nodes</strong> (e.g., HTTP Request, Google Search, Database query)</li>
  <li>Define a system prompt and let the agent autonomously call tools</li>
</ol>

<p><strong>Use cases</strong>:</p>
<ul>
  <li>Auto-research and summarize news</li>
  <li>Book flights by scraping airline sites</li>
  <li>Price comparison across shopping websites</li>
  <li>Email triage and auto-reply</li>
</ul>

<hr />

<h2 id="-building-ai-agents--code-python--ollama--openai-agent-sdk-todo">* Building AI Agents — Code: Python + Ollama + OpenAI Agent SDK (ToDo)</h2>]]></content><author><name></name></author><category term="AI" /><category term="LLM" /><category term="AI Model" /><category term="Vector DB" /><category term="LangChain" /><category term="Llama" /><category term="Mistral" /><category term="Ollama" /><category term="n8n" /><category term="OpenAI Agent SDK" /><summary type="html"><![CDATA[What is Opensource AI?]]></summary></entry><entry><title type="html">SRE Concepts</title><link href="https://amoldighe.github.io/2025/06/12/slo-error-trace-ft/" rel="alternate" type="text/html" title="SRE Concepts" /><published>2025-06-12T00:00:00+00:00</published><updated>2025-06-12T00:00:00+00:00</updated><id>https://amoldighe.github.io/2025/06/12/slo-error-trace-ft</id><content type="html" xml:base="https://amoldighe.github.io/2025/06/12/slo-error-trace-ft/"><![CDATA[<p>Lets explore these SRE concepts:</p>

<h3 id="1-service-level-objectives-slos">1. Service Level Objectives (SLOs)</h3>

<p>A Service Level Objective, or SLO, is a precise, measurable target for the reliability of a service. It is a key tool for defining what “good” looks like from a user’s perspective. An SLO is built on two core components:</p>

<ul>
  <li>
    <p><strong>Service Level Indicator (SLI):</strong> A quantitative measure of a service’s behavior. Common SLIs include:</p>

    <ul>
      <li>
        <p><strong>Latency:</strong> The time it takes to serve a request. (e.g., 99% of requests served in under 200ms)</p>
      </li>
      <li>
        <p><strong>Availability:</strong> The percentage of time a service is operational and serving requests. (e.g., 99.9% uptime)</p>
      </li>
      <li>
        <p><strong>Throughput:</strong> The number of requests a service can handle per second.</p>
      </li>
      <li>
        <p><strong>Error Rate:</strong> The percentage of requests that result in an error.</p>
      </li>
    </ul>
  </li>
  <li>
    <p><strong>Objective:</strong> The specific target you set for that SLI over a defined period.</p>
  </li>
</ul>

<p><strong>Why they matter:</strong> SLOs shift the focus from internal metrics to what truly impacts the end user. They are the contract between the service provider and the customer (whether internal or external) that sets clear expectations for reliability.</p>

<h3 id="2-error-budgets">2. Error Budgets</h3>

<p>The error budget is a direct byproduct of your SLO. It represents the maximum amount of “unreliability” that a service can tolerate over a given period without violating its SLO.</p>

<ul>
  <li><strong>The Math:</strong> If your SLO for a service’s availability is 99.9%, your error budget is the remaining 0.1% of time the service can be unavailable. For a 30-day month, that’s roughly 43 minutes of acceptable downtime.</li>
</ul>

<p><strong>Why they matter:</strong> The error budget is the central mechanism for balancing innovation and reliability. It provides a clear, quantitative threshold for risk.</p>

<ul>
  <li>
    <p><strong>When the budget is “in the green” (you have time left):</strong> The team can take more risks, like deploying a new feature, knowing that a brief failure won’t violate the SLO.</p>
  </li>
  <li>
    <p><strong>When the budget is “depleted” (you’ve used up your downtime):</strong> The team must stop all non-essential feature development and focus solely on improving reliability and fixing the underlying issues that caused the downtime. This “stop and fix” rule prevents the team from digging a deeper reliability hole.</p>
  </li>
</ul>

<h3 id="3-distributed-tracing">3. Distributed Tracing</h3>

<p>As applications become more complex and move from monoliths to microservices, it becomes nearly impossible to track a single request as it travels through a dozen different services. Distributed tracing is the solution to this problem.</p>

<ul>
  <li>
    <p><strong>What it is:</strong> A method for observing and profiling requests as they flow through a distributed system. It creates a complete timeline of a single request, from the moment it enters the system to the final response.</p>
  </li>
  <li>
    <p><strong>Key Concepts:</strong></p>

    <ul>
      <li>
        <p><strong>Span:</strong> A single unit of work within a trace, representing an operation like a database query, an API call, or a function execution. Each span has a start time, end time, and metadata.</p>
      </li>
      <li>
        <p><strong>Trace:</strong> A collection of spans that represents a complete end-to-end journey of a request. Spans are connected in a parent-child relationship to show the flow.</p>
      </li>
      <li>
        <p><strong>Context Propagation:</strong> The mechanism that passes unique trace and span IDs from one service to the next, allowing them to be connected into a single, cohesive trace.</p>
      </li>
    </ul>
  </li>
</ul>

<p><strong>Why it matters:</strong> Distributed tracing is essential for:</p>

<ul>
  <li>
    <p><strong>Root Cause Analysis:</strong> Quickly pinpointing which service or component failed or caused a slowdown.</p>
  </li>
  <li>
    <p><strong>Performance Optimization:</strong> Identifying bottlenecks and latency issues within a specific service or in the communication between services.</p>
  </li>
  <li>
    <p><strong>Understanding System Behavior:</strong> Providing a visual map of how different services interact with each other.</p>
  </li>
</ul>

<h3 id="4-architectural-fault-tolerance">4. Architectural Fault Tolerance</h3>

<p>Fault tolerance is the design philosophy of building a system that can continue to operate correctly, and with minimal impact, even when one or more of its components fail. It is about anticipating failure and designing a system to be resilient from the ground up.</p>

<ul>
  <li>
    <p><strong>Key Principles &amp; Patterns:</strong></p>

    <ul>
      <li>
        <p><strong>Redundancy:</strong> Having backup or duplicate components ready to take over if a primary component fails. This can be in the form of a hot-standby (active-passive) or multiple active components (active-active).</p>
      </li>
      <li>
        <p><strong>Failover:</strong> The automatic process of switching to a redundant system or component when a failure is detected. This should be as fast and seamless as possible to minimize downtime.</p>
      </li>
      <li>
        <p><strong>Circuit Breakers:</strong> A pattern that prevents a failing service from cascading its failure to other services. If a service is consistently failing, the circuit breaker “trips” and all subsequent requests fail fast instead of waiting and overloading the failing service.</p>
      </li>
      <li>
        <p><strong>Load Balancing:</strong> Distributing incoming requests across multiple instances of a service to prevent a single point of failure and handle high traffic loads.</p>
      </li>
      <li>
        <p><strong>Rate Limiting:</strong> A mechanism to control the rate of requests a service receives, protecting it from being overwhelmed and failing.</p>
      </li>
    </ul>
  </li>
</ul>

<p>By combining these concepts, SRE teams can move from a reactive, crisis-driven model to a proactive, data-informed approach to managing reliability. SLOs set the targets, error budgets provide the framework for risk management, distributed tracing offers the visibility to debug and optimize, and architectural fault tolerance ensures the system is built to withstand inevitable failures.</p>]]></content><author><name></name></author><category term="SRE" /><category term="SLO" /><category term="Error Budget" /><category term="Distributed Tracing" /><category term="Architectural Fault Tolerance" /><category term="RCA" /><category term="Load Balancing" /><category term="Performance Optimization" /><category term="Rate Limiting" /><category term="Failover" /><summary type="html"><![CDATA[Lets explore these SRE concepts:]]></summary></entry><entry><title type="html">Data Warehouse vs Data Lake vs Data Lakehouse</title><link href="https://amoldighe.github.io/2025/05/04/dwh-dl-dlh/" rel="alternate" type="text/html" title="Data Warehouse vs Data Lake vs Data Lakehouse" /><published>2025-05-04T00:00:00+00:00</published><updated>2025-05-04T00:00:00+00:00</updated><id>https://amoldighe.github.io/2025/05/04/dwh-dl-dlh</id><content type="html" xml:base="https://amoldighe.github.io/2025/05/04/dwh-dl-dlh/"><![CDATA[<p><strong>1. Data Warehouse (DW)</strong></p>

<p>A centralized repository designed for structured data (tables, rows, columns). Optimized for business intelligence (BI), reporting, and analytics.</p>

<p>Data type: Structured (relational, transactional, processed).</p>

<p>Schema: Schema-on-write (define schema before loading).</p>

<p>Cost: Expensive (compute + storage tightly coupled).</p>

<p>Use cases: Dashboards, trend analysis, financial reporting.</p>

<p>Examples: Snowflake, Amazon Redshift, Google BigQuery, Teradata.</p>

<p><strong>2. Data Lake</strong></p>

<p>A storage system that holds raw data of all types (structured, semi-structured, unstructured). Designed for flexibility and large-scale storage, not optimized for BI directly.</p>

<p>Data type: Structured (CSV, Parquet), semi-structured (JSON, XML), unstructured (logs, images, videos).</p>

<p>Schema: Schema-on-read (define schema when querying).</p>

<p>Cost: Cheaper (storage &amp; compute decoupled).</p>

<p>Use cases: Data science, machine learning, big data analytics.</p>

<p>Examples: Amazon S3 + Athena, Azure Data Lake Storage, Hadoop HDFS.</p>

<p><strong>3. Data Lakehouse</strong></p>

<p>A hybrid approach that combines the best of both data lakes and warehouses. Stores all data types like a data lake, but supports structured querying and ACID transactions like a warehouse.</p>

<p>Data type: All types (structured + unstructured).</p>

<p>Schema: Flexible → supports both schema-on-write and schema-on-read.</p>

<p>Cost: More cost-effective than DW, scalable like DL.</p>

<p>Use cases: BI + ML/AI + advanced analytics in one platform.</p>

<p>Examples: Databricks Delta Lake, Apache Iceberg, Snowflake (newer versions).</p>

<table>
  <thead>
    <tr>
      <th>Feature</th>
      <th>Data Warehouse</th>
      <th>Data Lake</th>
      <th>Data Lakehouse</th>
    </tr>
  </thead>
  <tbody>
    <tr>
      <td>Data Types</td>
      <td>Structured only</td>
      <td>All (structured → raw)</td>
      <td>All (structured + raw)</td>
    </tr>
    <tr>
      <td>Schema</td>
      <td>Schema-on-write</td>
      <td>Schema-on-read</td>
      <td>Both</td>
    </tr>
    <tr>
      <td>Performance</td>
      <td>High for BI</td>
      <td>Slower (raw queries)</td>
      <td>Optimized (BI + ML)</td>
    </tr>
    <tr>
      <td>Cost</td>
      <td>High</td>
      <td>Low</td>
      <td>Medium/Low</td>
    </tr>
    <tr>
      <td>Best For</td>
      <td>Business reporting</td>
      <td>ML, AI, Big Data</td>
      <td>Unified analytics</td>
    </tr>
  </tbody>
</table>]]></content><author><name></name></author><category term="data warehouse" /><category term="datalake" /><category term="data lakehouse" /><category term="HDFS" /><category term="Snowflake" /><category term="Teradata" /><category term="Hadoop" /><category term="AI" /><category term="ML" /><category term="BI" /><summary type="html"><![CDATA[1. Data Warehouse (DW)]]></summary></entry></feed>